Chapter 09: Shadow Effect
Add dynamic shadows to the game
Our lighting system is looking great, but the lights do not feel fully grounded in the world. They shine right through the walls, the bat, and even our slime! To truly sell the illusion of light, we need darkness. We need shadows.
In this final effects chapter:
- We are going to implement a dynamic 2D shadow system. The shadows will be drawn with a new vertex shader, and integrated into the point light shader from the previous chapter.
- After the effect is working, we will port the effect to use a more efficient approach using a tool called the Stencil Buffer.
- Lastly, we will explore some visual tricks to improve the look and feel of the shadows.
By the end of this chapter, your game will look something like this:
| Figure 9-1: The final shadow effect |
If you are following along with code, here is the code from the end of the previous chapter.
Sample Source
The full source for this tuturial can be located on the 3.8.5 branch of the main MonoGame.Samples repository
As shown below:
https://github.com/MonoGame/MonoGame.Samples/tree/3.8.5/Tutorials/2dShaders
2D Shadows
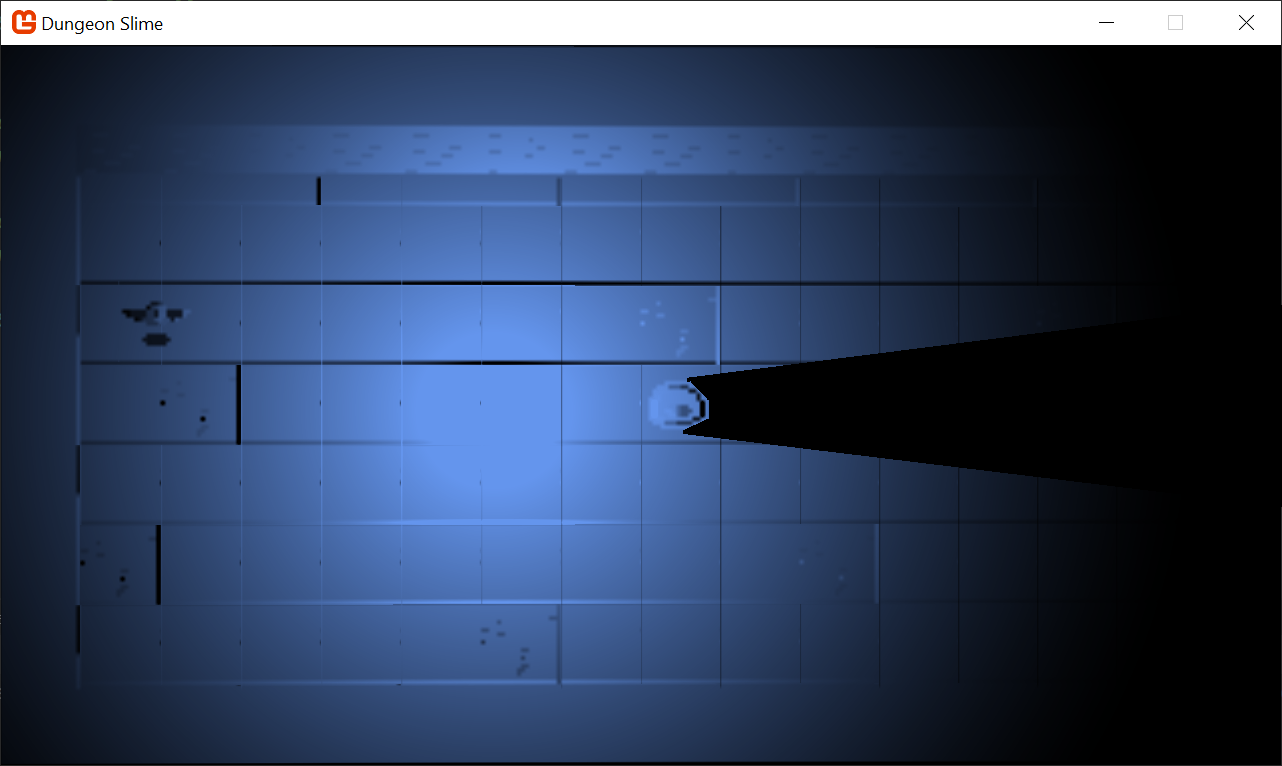
Take a look at the current lighting in Dungeon Slime. In this screenshot, there is a single light source. The bat and the slime do not cast shadows, and without these shadows, it is hard to visually identify where the light's position is.
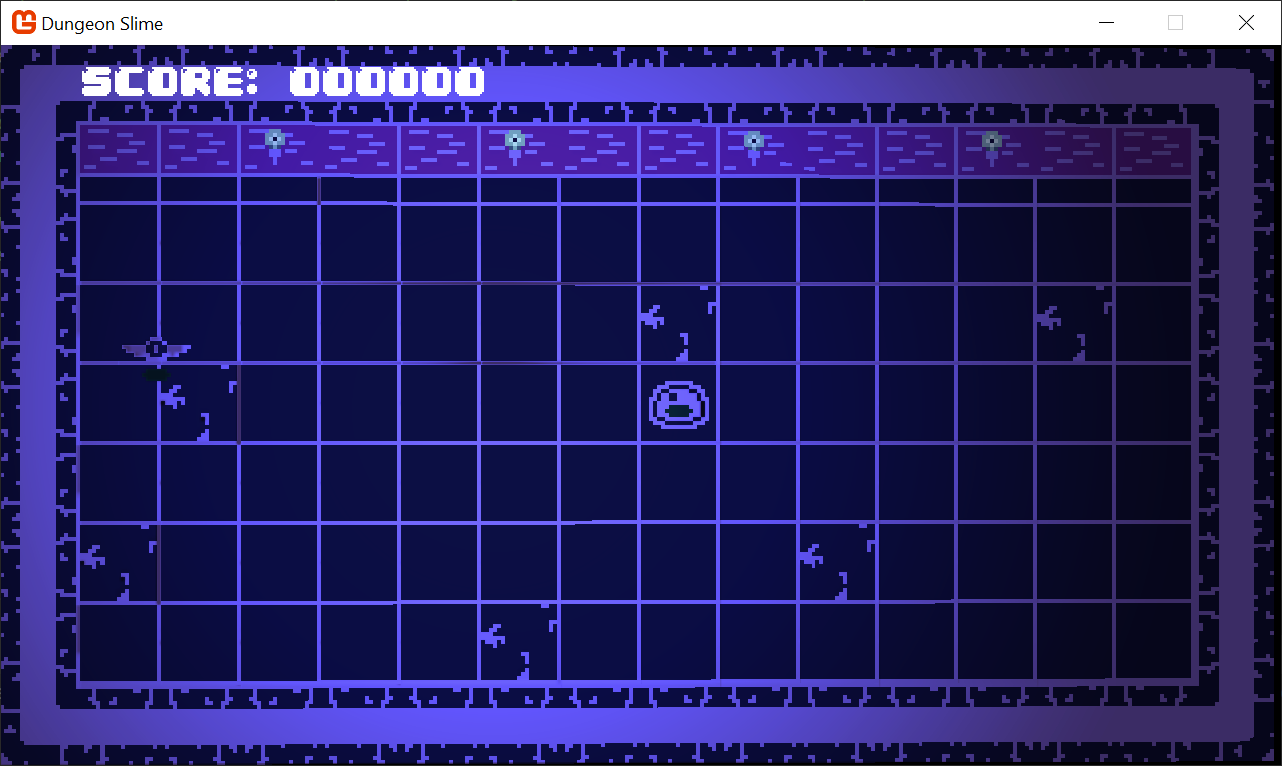 |
|---|
| Figure 9-2: A light with no shadows |
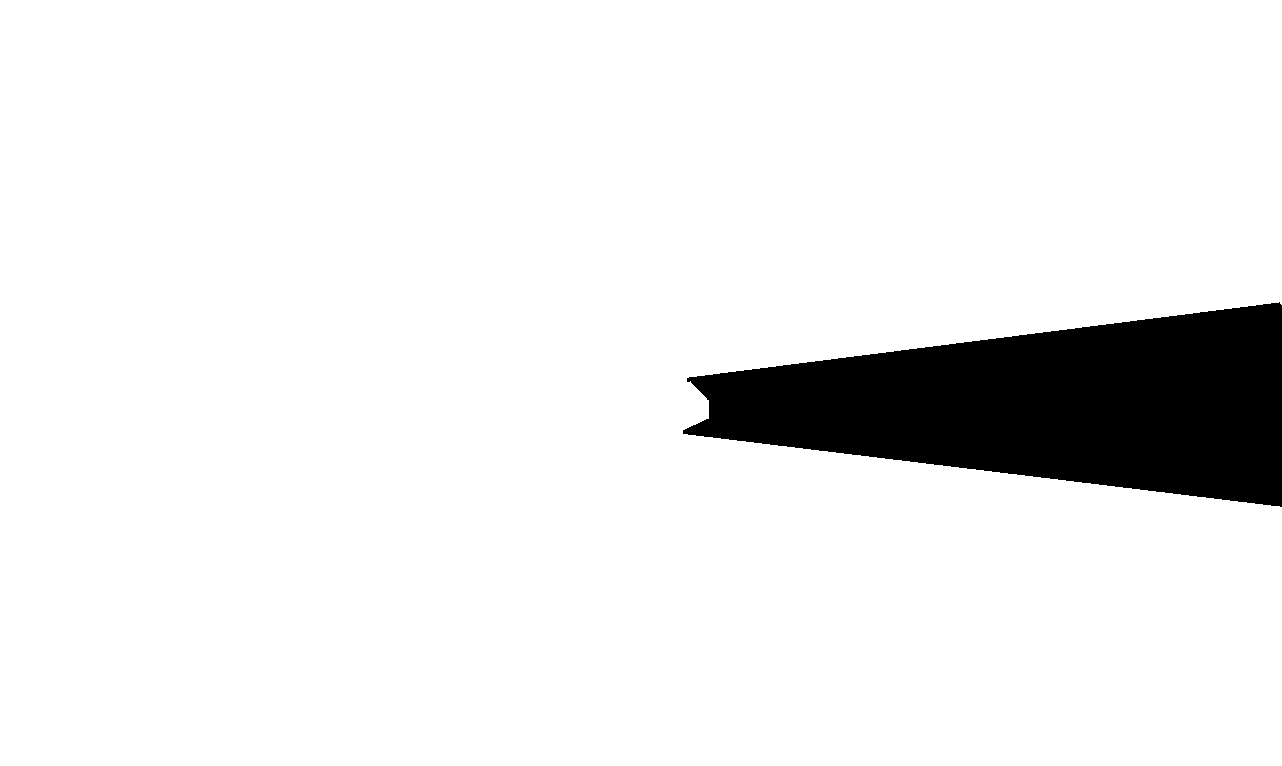
If the slime was casting a shadow, then the position of the light would be a lot easier to decipher just from looking at the image. Shadows help ground the objects in the scene. Just to visualize it, this image is a duplicate of the above, but with a pink debug shadow drawn on top to illustrate the desired effect.
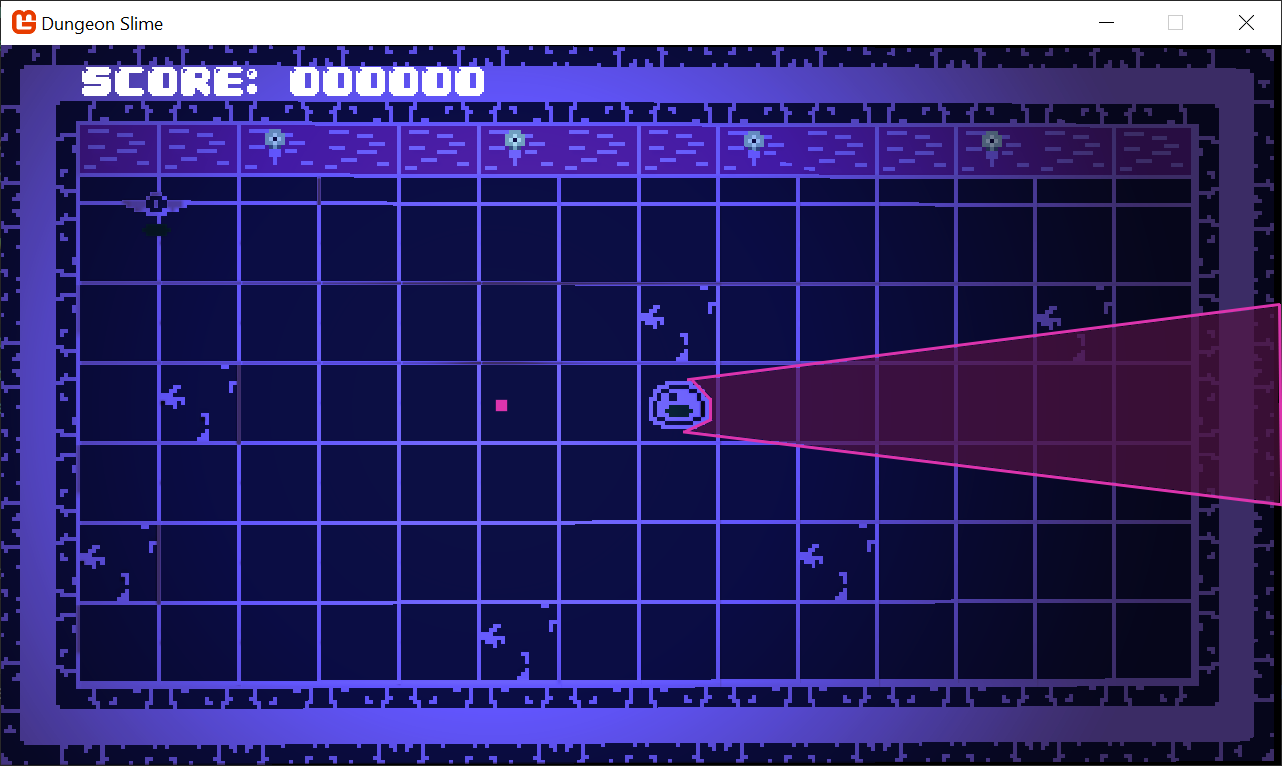 |
|---|
| Figure 9-3: A hand drawn shadow |
The pink section is called the shadow hull. We can split up the entire effect into two distinct stages.
- We need a way to calculate and render the shadow hulls from all objects that we want to cast shadows (such as bats and slime segments),
- We need a way to use the shadow hull to actually mask the lighting from the previous chapter.
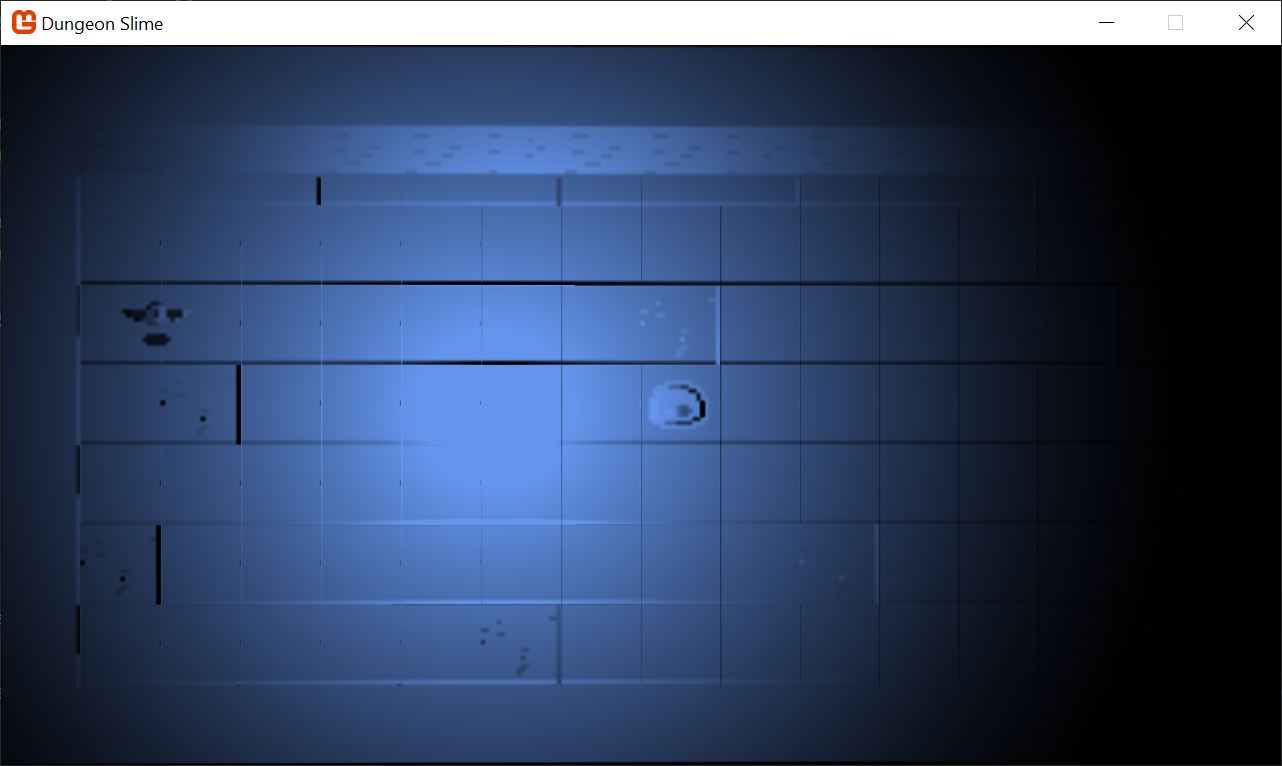
Step 2 is actually a lot easier to understand than step 1. Imagine that the shadow hulls were drawn to an off-screen texture, like the one in the image below:
- The black sections represent shadow hulls
- The white sections are places where no shadow hulls exist.
This resource is called the ShadowBuffer.
 |
|---|
| Figure 9-4: A shadow map |
We would need to have a ShadowBuffer for each light source, and if we did, then when the light was being rendered, we could pass in the ShadowBuffer as an additional texture resource to the _pointLightEffect.fx, and use the pixel value of the ShadowBuffer to mask the light source.
In the sequence below, the left image is just the LightBuffer. The middle image is the ShadowBuffer, and the right image is the product of the two images. Any pixel in the ShadowBuffer that was white means the final image uses the color from the LightBuffer, and any black pixel from the ShadowBuffer becomes black in the final image as well. The multiplication of the LightBuffer and ShadowBuffer complete the shadow effect.
 |
|
 |
|---|---|---|
Figure 9-5: The LightBuffer |
Figure 9-6: The ShadowBuffer |
Figure 9-7: The multiplication of the two images |
The mystery to unpack is step 1, how to render the ShadowBuffer in the first place.
Rendering the Shadow Buffer
To build some intuition, we will start by considering a shadow caster that is a single line segment. If we can generate a shadow for a single line segment, then we could compose multiple line segments to replicate the shape of the slime sprite. In the image below, there is a single light source at position L, and a line segment between points A, and B.
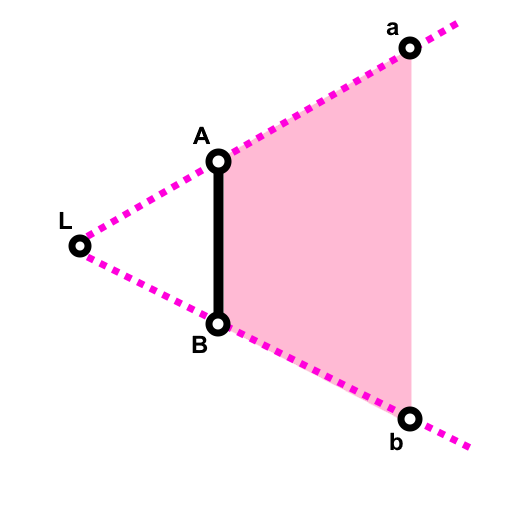 |
|---|
| Figure 9-8: A diagram of a simple light and line segment |
The shape we need to draw is the non-regular quadrilateral defined by A, a, b, and B. It is shaded in pink. These points are in world space. Given that we know where the line segment is, we know where A and B are, but we do not yet know a and b's location.
Note
A and a naming convention.
The A and a points lay on the same ray from the light starting at L. The uppercase A denotes that the position is first from the light's point of view. The same pattern holds for B and b.
However, the SpriteBatch usually only renders rectangular shapes. By default, it appears SpriteBatch cannot help us draw these sorts of shapes, but fortunately, since the shadow hull has exactly 4 vertices, and SpriteBatch draws quads with exactly 4 vertices, we can use a custom vertex function.
This diagram shows an abstract pixel being drawn at some position P. The corners of the pixel may be defined as S, D, F and G.
| Figure 9-9: A diagram showing a pixel |
Our goal is to define a function that transforms the positions S, D, F, and G into the positions, A, a, b, and B. The table below shows the desired mapping.
| Pixel Point | Shadow Hull Point |
|---|---|
| S | A |
| D | a |
| F | b |
| G | B |
Each vertex (S, D, F, and G) has additional metadata beyond positional data. The diagram includes P, but that point is the point specified to SpriteBatch, and it is not available in the shader function. The vertex shader runs once for each vertex, but completely in isolation of the other vertices. Remember, the input for the standard vertex shader is as follows:
struct VertexShaderInput
{
    float4 Position	: POSITION0;
    float4 Color	: COLOR0;
    float2 TexCoord	: TEXCOORD0;
};
The TexCoord data is a two dimensional value that tells the pixel shader how to map an image onto the rectangle. The values for TexCoord can be set by the SpriteBatch's sourceRectangle field in the Draw(), but if left unset, they default to 0 through 1 values. The default mapping is in the table below,
| Vertex | TexCoord.x | TexCoord.y |
|---|---|---|
| S | 0 | 0 |
| D | 1 | 0 |
| F | 1 | 1 |
| G | 0 | 1 |
If we use the defaults, then we could use these values to compute a unique ID for each vertex in the pixel. The function, x + y*2 will produce a unique hash of the inputs for the domain we care about. The following table shows the unique values.
| Vertex | TexCoord.x | TexCoord.y | unique ID |
|---|---|---|---|
| S | 0 | 0 | 0 |
| D | 1 | 0 | 1 |
| F | 1 | 1 | 3 |
| G | 0 | 1 | 2 |
The unique value is important, because it gives the vertex shader the ability to know which vertex is being processed, rather than any arbitrary vertex. For example, now the shader can know if it is processing S, or D based on if the unique ID is 0 and 1. The math for mapping S --> A may be quite different than the math for mapping D --> a.
Additionally, the default TexCoord values allow the vertex shader to take any arbitrary positions, (S, D, F, and G), and produce the point P where the SpriteBatch is drawing the sprite in world space. If you recall from the previous chapter, MonoGame uses the screen size as a basis for generating world space positions, and then the default projection matrix transforms those world space positions into clip space. Given a shader parameter, float2 ScreenSize, the vertex shader can convert back from the world-space positions (S, D, F, and G) to the P position by subtracting .5 * ScreenSize * TexCoord from the current vertex.
The Color data is usually used to tint the resulting sprite in the pixel shader, but in our use case, for a shadow hull we do not really need a color whatsoever. Instead, we can use this float4 field as arbitrary data. The trick is that we will need to pack whatever data we need into a float4 and pass it via the Color type in MonoGame. This color comes from the Color value passed to the SpriteBatch's Draw() call.
The Position and Color both use float4 in the standard vertex shader input, and it may appear as though they should have the same precision, however, they are not passed from MonoGame's SpriteBatch as the same type. When SpriteBatch goes to draw a sprite, it uses a Color for the Color, and a Vector3 for the Position. A Color has 4 bytes, but a Vector3 has 12 bytes. This can be seen in the VertexPositionColorTexture class. The takeaway is that we can only pack a third as much data into the Color semantic as the Position gets, and that may limit the types of values we want to pack into the Color value.
Finally, the light's position must be provided as a shader parameter, float2 LightPosition. The light's position should be in the same world-space coordinate system in which the light is drawn.
Vertex Shader Theory
Now that we have a good understanding of the available inputs, and the goal of the vertex function, we can begin moving towards a solution. Unlike the previous chapters, we are going to build up a fair bit of math before converting any of this is to a working shader.
To begin:
- We draw the pixel at the start of the line segment itself,
A. - The position where the pixel is drawn is definitionally
P - Drawing the pixel at
A, we have setA = P.
Every point (S, D, F, and G) needs to find P. To do that, the TexCoord can be treated as a direction from P to the current point, and the ScreenSize shader parameter can be used to find the right amount of distance to travel along that direction:
Note
The next few snippets of shader code are pseudocode. Just follow along with the text and the full shader will be available later in the next section.
// start by putting the world space position into a variable...
float2 pos = input.Position.xy;

// `P` is the center of the shape, but the `pos` is half a pixel off.
float2 P = pos - (.5 * input.TexCoord) / ScreenSize;

// now we have identified `A` as `P`
float2 A = P;
Next, we pack the Color value as the vector (B - A):
- The
xcomponent of the vector can live in theredandgreenchannels of theColor. - The
ycomponent will live in theblueandalphachannels. - In the vertex shader, the
Bcan be derived by unpacking the(B - A)vector from theCOLORsemantic and adding it to theA.
The reason we pack the difference between B and A into the Color, and not B itself is due to the lack of precision in the Color type. There are only 4 bytes to pack all the information, which means 2 bytes per x and y. Likely, the line segment will be small, so the values of (B - A) will fit easier into a 2-byte channel:
// the `input.Color` has the (B-A) vector
float2 aToB = unpack(input.Color);

// to find `B`, start at `A`, and move by the delta
float2 B = A + aToB;
The point a must lay somewhere on the ray cast from the LightPosition to the start of the line segment, A. Additionally, the point a must lay beyond A from the light's perspective. The direction of the ray can be calculated as:
float2 lightRayA = normalize(A - LightPosition);
Then, given some distance, beyond A, the point a can be produced as:
float2 a = A + distance * lightRayA;
The same can be said for b:
float2 lightRayB = normalize(B - LightPosition);
float2 b = B + distance * lightRayB;
Now the vertex shader function knows all positions, A, a, b, and B. The TexCoord can be used to derive a unique ID, and the unique ID can be used to select one of the points:
int id = input.TexCoord.x + input.TexCoord.y * 2;
if (id == 0) {        // S --> A
    pos = A;
} else if (id == 1) { // D --> a
    pos = a;
} else if (id == 3) { // F --> b
    pos = b;
} else if (id == 2) { // G --> B
    pos = B;
}
Once all of the positions are mapped, our goal is complete! We have a vertex function and strategy to convert a single pixel's 4 vertices into the 4 vertices of a shadow hull!
Implementation
To start implementing the effect, create a new Sprite Effect in the MonoGameLibrary's SharedContent effect folder called shadowHullEffect.fx. Load it into the Core class as before in the previous chapters.
Note
As we did back in Chapter 6, temporarily disable the GameScene update by adding a return; statement AFTER setting all the material properties. Just to make it easier when looking at the shadow effect. Or, add the game pause mechanic from Chapter 8, and make it start paused.
Otherwise, the shadows are going to be hard to develop, because they will be moving around as the game plays out.
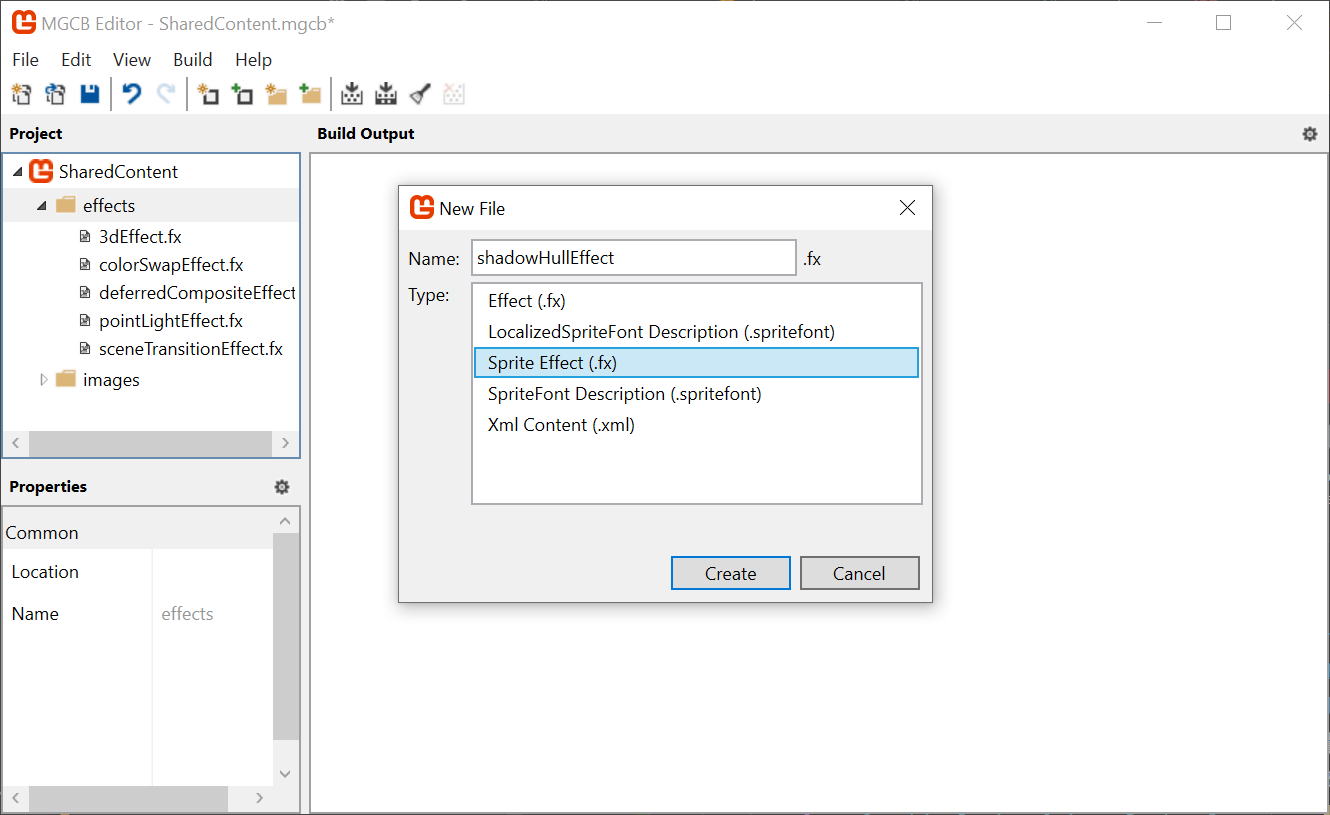 |
|---|
Figure 9-10: Create the shadowHullEffect in MGCB |
Add the following
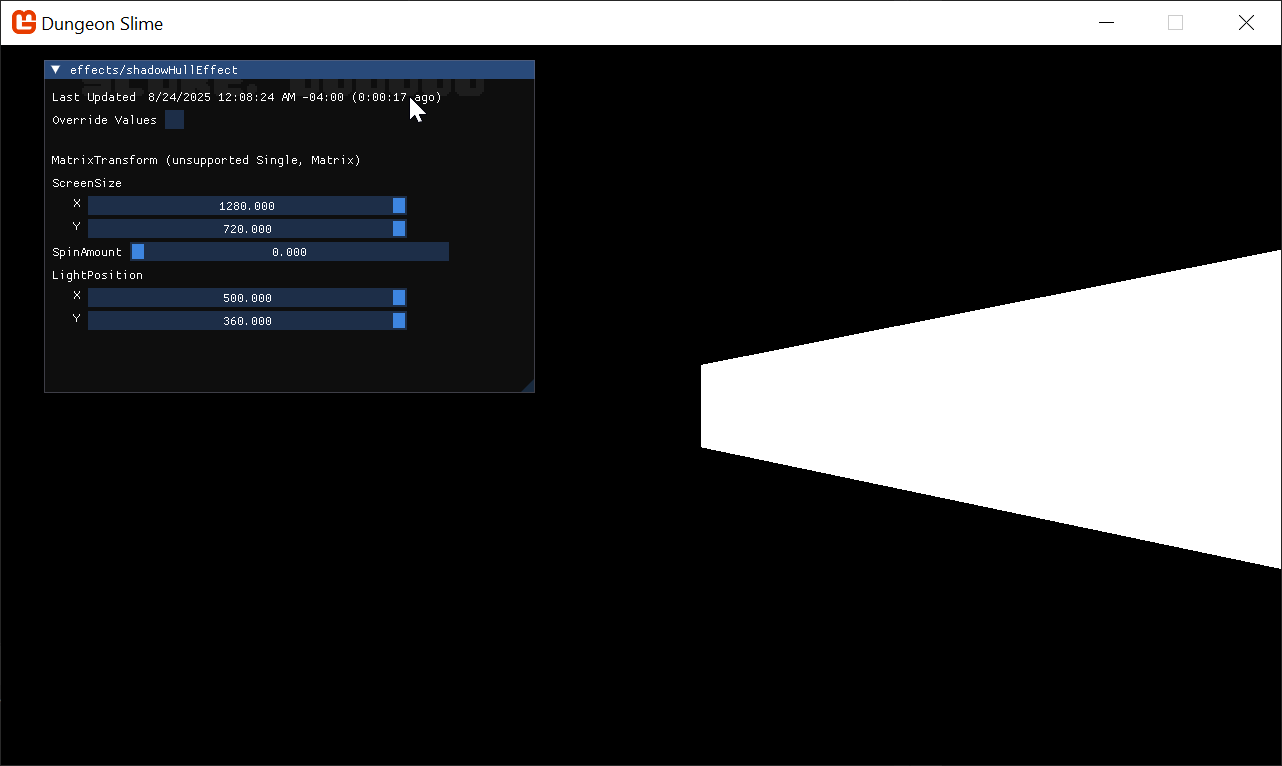
ShadowHullMaterialproperty to theCore.csclass in theMonoGameLibraryproject and replace its contents with the following:/// <summary> /// The material that draws shadow hulls /// </summary> public static Material ShadowHullMaterial { get; private set; }Load it as watched content in the
LoadContent()method:protected override void LoadContent() { base.LoadContent(); // ... ShadowHullMaterial = SharedContent.WatchMaterial("effects/shadowHullEffect"); ShadowHullMaterial.IsDebugVisible = true; }Finally, update the
Update()method on theMaterialin theCore'sUpdate()method. Without this, hot-reload will not work:protected override void Update(GameTime gameTime) { // ... ShadowHullMaterial.Update(); base.Update(gameTime); }
The Shadow caster
To represent the shadow casting objects in the game, we will create a new class called ShadowCaster in the MonoGameLibrary's graphics folder. For now, we will keep the ShadowCaster class as simple as possible while we build the basics, it will just hold the positions of the line segment from the theory section, A, and B.
Create the class and follow the steps to integrate it with the rest of the project.
Create a new class called
ShadowCaster.csin theMonoGameLibraryproject under theGraphicsfolder and replace its contents with the following:using Microsoft.Xna.Framework; namespace MonoGameLibrary.Graphics; public class ShadowCaster { public Vector2 A; public Vector2 B; }In the
GameScene, add a class member to hold all the variousShadowCastersthat will exist in the game:// A list of shadow casters for all the lights private List<ShadowCaster> _shadowCasters = new List<ShadowCaster>();For now, to keep things simple, temporarily replace the
InitializeLights()function in theGameSceneto have a singlePointLightand a singleShadowCaster:private void InitializeLights() { // torch 1 _lights.Add(new PointLight { Position = new Vector2(500, 360), Color = Color.CornflowerBlue, Radius = 700 }); // simple shadow caster _shadowCasters.Add(new ShadowCaster { A = new Vector2(700, 320), B = new Vector2(700, 400) }); }Important
If you are not pausing the game logic, make sure to comment out the
MoveLightsAround()function, because it assumes there will be more than 1 light.Every
PointLightneeds its ownShadowBuffer. If you recall, theShadowBufferis an off-screen texture that will have white pixels where the light is visible, and black pixels where light is not visible due to a shadow.Open the
PointLightclass in theMonoGameLibraryproject and add a newRenderTarget2Dfield:/// <summary> /// The render target that holds the shadow map /// </summary> public RenderTarget2D ShadowBuffer { get; set; }And instantiate the
ShadowBufferin a new constructor to thePointLightclass:public PointLight() { var viewPort = Core.GraphicsDevice.Viewport; ShadowBuffer = new RenderTarget2D(Core.GraphicsDevice, viewPort.Width, viewPort.Height, false, SurfaceFormat.Color, DepthFormat.None, 0, RenderTargetUsage.PreserveContents); }Now, we need to find a place to render the
ShadowBufferperPointLightbefore the deferred renderer draws the light itself.Copy this function into the
PointLightclass:public void DrawShadowBuffer(List<ShadowCaster> shadowCasters) { Core.GraphicsDevice.SetRenderTarget(ShadowBuffer); Core.GraphicsDevice.Clear(Color.Black); Core.ShadowHullMaterial.SetParameter("LightPosition", Position); var screenSize = new Vector2(ShadowBuffer.Width, ShadowBuffer.Height); Core.SpriteBatch.Begin( effect: Core.ShadowHullMaterial.Effect, rasterizerState: RasterizerState.CullNone ); foreach (var caster in shadowCasters) { var posA = caster.A; // TODO: pack the (B-A) vector into the color channel. Core.SpriteBatch.Draw(Core.Pixel, posA, Color.White); } Core.SpriteBatch.End(); }Warning
The
(B-A)vector is not being packed into the color channel, yet.We will come back to that soon!
Next, create a second method in the
PointLightclass that will call theDrawShadowBufferfunction for a list of lights and shadow casters:public static void DrawShadows( List<PointLight> pointLights, List<ShadowCaster> shadowCasters) { foreach (var light in pointLights) { light.DrawShadowBuffer(shadowCasters); } }Finally, back in the
GameSceneclass, call theDrawShadows()method in theDrawcall, right before theDeferredRenderer'sStartLightPass()method:public override void Draw(GameTime gameTime) { // ... Core.SpriteBatch.End(); // render the shadow buffers PointLight.DrawShadows(_lights, _shadowCasters); // start rendering the lights _deferredRenderer.StartLightPhase(); // ... }For debug visualization purposes, also add this snippet to the end of the
GameScene'sDraw()just so you can see theShaderBufferas we debug it:public override void Draw(GameTime gameTime) { // ... Core.SpriteBatch.Begin(); Core.SpriteBatch.Draw(_lights[0].ShadowBuffer, Vector2.Zero, Color.White); Core.SpriteBatch.End(); // Draw the UI _ui.Draw(); }
When you run the game, you will see a totally blank game (other than the GUI). This is because the shadow map is currently being cleared to black to start, and the debug view renders that on top of everything else.
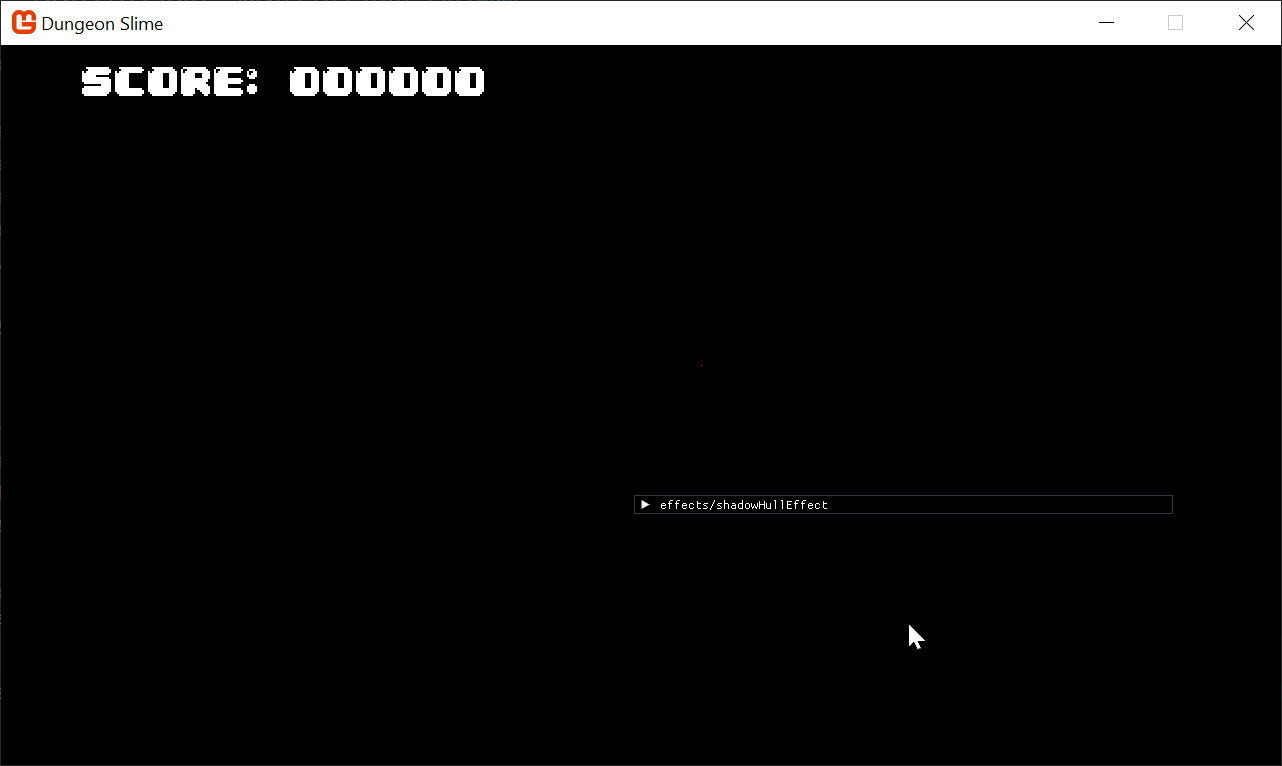 |
|---|
| Figure 9-11: A blank shadow buffer |
Warning
If you have set your project back to the <OutputType>Exe</OutputType> in the .csproj file, then you will see some warnings like these:
Warning: cannot set shader parameter=[LightPosition] because it does not exist in the compiled shader=[effects/shadowHullEffect]
Do not worry, we will be cleaning this up soon! The reason these appear is because we have not implemented the shader yet.
Bit Packing
We cannot implement the vertex shader theory until we can pack the (B-A) vector into the Color argument for the SpriteBatch. For this we will use a technique called bit-packing.
For the sake of brevity, we will skip over the derivation of these functions.
Tip
Bit-packing is a broad category of algorithms that change the underlying bit representation of some variable. The most basic idea is that all of your variables are just bits, and its up to you how you want to arrange them. To learn more, check out the following articles,
Add this function to your
PointLightclass:public static Color PackVector2_SNorm(Vector2 vec) { // Clamp to [-1, 1) vec = Vector2.Clamp(vec, new Vector2(-1f), new Vector2(1f - 1f / 32768f)); short xInt = (short)(vec.X * 32767f); // signed 16-bit short yInt = (short)(vec.Y * 32767f); byte r = (byte)((xInt >> 8) & 0xFF); byte g = (byte)(xInt & 0xFF); byte b = (byte)((yInt >> 8) & 0xFF); byte a = (byte)(yInt & 0xFF); return new Color(r, g, b, a); }Next we consume the packing function in the
DrawShadowBufferfunction in thePointLightclass instead of passingColor.White. To do that we need to create thebToAvector, pack it inside aColorinstance, and then pass it to theSpriteBatch:public void DrawShadowBuffer(List<ShadowCaster> shadowCasters) { /// ... foreach (var caster in shadowCasters) { var posA = caster.A; var aToB = (caster.B - caster.A) / screenSize; var packed = PackVector2_SNorm(aToB); Core.SpriteBatch.Draw(Core.Pixel, posA, packed); } Core.SpriteBatch.End(); }On the shader side, open the
shadowHullEffect.fxfile and add the following function:float2 UnpackVector2FromColor_SNorm(float4 color) { // Convert [0,1] to byte range [0,255] float4 bytes = color * 255.0; // Reconstruct 16-bit unsigned ints (x and y) float xInt = bytes.r * 256.0 + bytes.g; float yInt = bytes.b * 256.0 + bytes.a; // Convert from unsigned to signed short range [-32768, 32767] if (xInt >= 32768.0) xInt -= 65536.0; if (yInt >= 32768.0) yInt -= 65536.0; // Convert from signed 16-bit to float in [-1, 1] float x = xInt / 32767.0; float y = yInt / 32767.0; return float2(x, y); }Now we have the tools to start implementing the vertex shader! Anytime you want to override the default
SpriteBatchvertex shader the shader needs to fulfill the world-space to clip-space transformation. For this we can re-use the work done in the previous chapter.Replace the
VertexShaderOutputstruct with the following line:#include "3dEffect.fxh"Add the
ShadowHullVSvertex shader function derived from the Vertex Shader theory discussed earlier in the chapter:Important
The following MUST be placed after the
UnpackVector2FromColor_SNormfunction as the newShadowHullVSfunction consumes it!float2 LightPosition; VertexShaderOutput ShadowHullVS(VertexShaderInput input) { VertexShaderInput modified = input; float distance = ScreenSize.x + ScreenSize.y; float2 pos = input.Position.xy; float2 P = pos - (.5 * input.TexCoord) / ScreenSize; float2 A = P; float2 aToB = UnpackVector2FromColor_SNorm(input.Color) * ScreenSize; float2 B = A + aToB; float2 lightRayA = normalize(A - LightPosition); float2 a = A + distance * lightRayA; float2 lightRayB = normalize(B - LightPosition); float2 b = B + distance * lightRayB; int id = input.TexCoord.x + input.TexCoord.y * 2; if (id == 0) { // S --> A pos = A; } else if (id == 1) { // D --> a pos = a; } else if (id == 3) { // F --> b pos = b; } else if (id == 2) { // G --> B pos = B; } modified.Position.xy = pos; VertexShaderOutput output = MainVS(modified); return output; }Set the technique for the vertex shader function:
technique SpriteDrawing
{
   pass P0
   {
      PixelShader = compile PS_SHADERMODEL MainPS();
      VertexShader = compile VS_SHADERMODEL ShadowHullVS();
   }
};
Replace the pixel shader function for the
shadowHullEffect, as it needs to ignore theinput.Colorand just return a solid color:float4 MainPS(VertexShaderOutput input) : COLOR { return 1; // return white }Finally, to make sure the default vertex shader work, we need to pass the
MatrixTransformandScreenSizeshader parameters in theGameScene'sUpdate()loop, next to where they are being configured for the existingPointLightMaterial:public override void Update(GameTime gameTime) { // ... var matrixTransform = _camera.CalculateMatrixTransform(); _gameMaterial.SetParameter("MatrixTransform", matrixTransform); Core.PointLightMaterial.SetParameter("MatrixTransform", matrixTransform); Core.PointLightMaterial.SetParameter("ScreenSize", new Vector2(Core.GraphicsDevice.Viewport.Width, Core.GraphicsDevice.Viewport.Height)); Core.ShadowHullMaterial.SetParameter("MatrixTransform", matrixTransform); Core.ShadowHullMaterial.SetParameter("ScreenSize", new Vector2(Core.GraphicsDevice.Viewport.Width, Core.GraphicsDevice.Viewport.Height)); // ... }Warning
If you added a pause mechanic to the game for development, make sure the
Update()is able to set all the shader parameters before the earlyreturnstatement. Otherwise you may see a black screen instead of the expected effect.
Now if you run the game, you will see the white shadow hull.
 |
|---|
| Figure 9-12: A shadow hull |
Integrating the shadow with the lighting
To get the basic shadow effect working with the rest of the renderer, we need to do the multiplication step between the ShadowBuffer and the LightBuffer in the pointLightEffect.fx shader.
Add an additional texture and sampler to the
pointLightEffect.fxfile:Texture2D ShadowBuffer; sampler2D ShadowBufferSampler = sampler_state { Texture = <ShadowBuffer>; };Then, in the
MainPSof the light effect, read the current value from the shadow buffer and use it as a multiplier at the end when calculating the final light color:float4 MainPS(LightVertexShaderOutput input) : COLOR { // ... float2 screenCoords = .5*(input.ScreenData.xy + 1); screenCoords.y = 1 - screenCoords.y; float shadow = tex2D(ShadowBufferSampler,screenCoords).r; float4 normal = tex2D(NormalBufferSampler,screenCoords); // ... float4 color = input.Color; color.a *= falloff * lightAmount * shadow; return color; }Before running the game, we need to pass the
ShadowBufferto the point light's draw invocation.In the
Draw()method in thePointLightclass, change theSpriteBatchto useImmediatesorting, and forward theShadowBufferto the shader parameter for each light:public static void Draw(SpriteBatch spriteBatch, List<PointLight> pointLights, Texture2D normalBuffer) { spriteBatch.Begin( effect: Core.PointLightMaterial.Effect, blendState: BlendState.Additive, sortMode: SpriteSortMode.Immediate ); foreach (var light in pointLights) { Core.PointLightMaterial.SetParameter("ShadowBuffer", light.ShadowBuffer); var diameter = light.Radius * 2; var rect = new Rectangle((int)(light.Position.X - light.Radius), (int)(light.Position.Y - light.Radius), diameter, diameter); spriteBatch.Draw(normalBuffer, rect, light.Color); } spriteBatch.End(); }Disable the debug visualization to render the
ShadowMapon top of everything else at the end of theDrawmethod in theGameSceneclass, and run the game.// Remove this segment Core.SpriteBatch.Begin(); Core.SpriteBatch.Draw(_lights[0].ShadowBuffer, Vector2.Zero, Color.White); Core.SpriteBatch.End();Important
If you are using WindowsDX instead of DesktopGL, then your lights will not look like the screenshot below! To fix it, skip ahead to the next section. After you have fixed the issue, come back here and finish the final few steps. The error will also go away by the time we reach the Stencil shadows section of this tutorial, so if you prefer to just keep reading, go ahead.
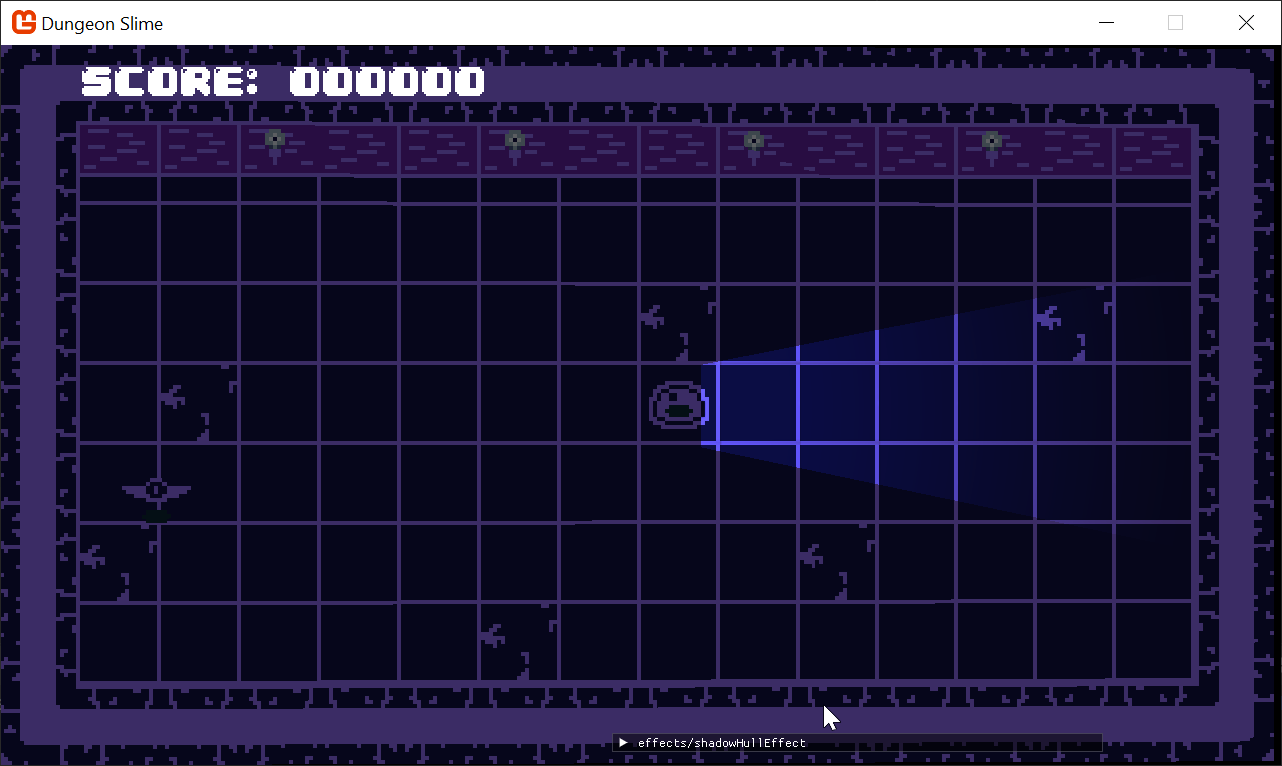
Figure 9-13: The light is appearing inverted Oops, the shadows and lights are appearing opposite of where they should! This is because the
ShadowBufferis inverted.In the
PointLightclass, change the clear color for theShadowBufferto white:public void DrawShadowBuffer(List<ShadowCaster> shadowCasters) { Core.GraphicsDevice.SetRenderTarget(ShadowBuffer); // clear the shadow buffer to white to start Core.GraphicsDevice.Clear(Color.White); // ... }And change the
ShadowHullEffectpixel shader to return a solid black rather than white:float4 MainPS(VertexShaderOutput input) : COLOR { return float4(0,0,0,1); // return black }
And now the shadow appears correctly for our simple single line segment!
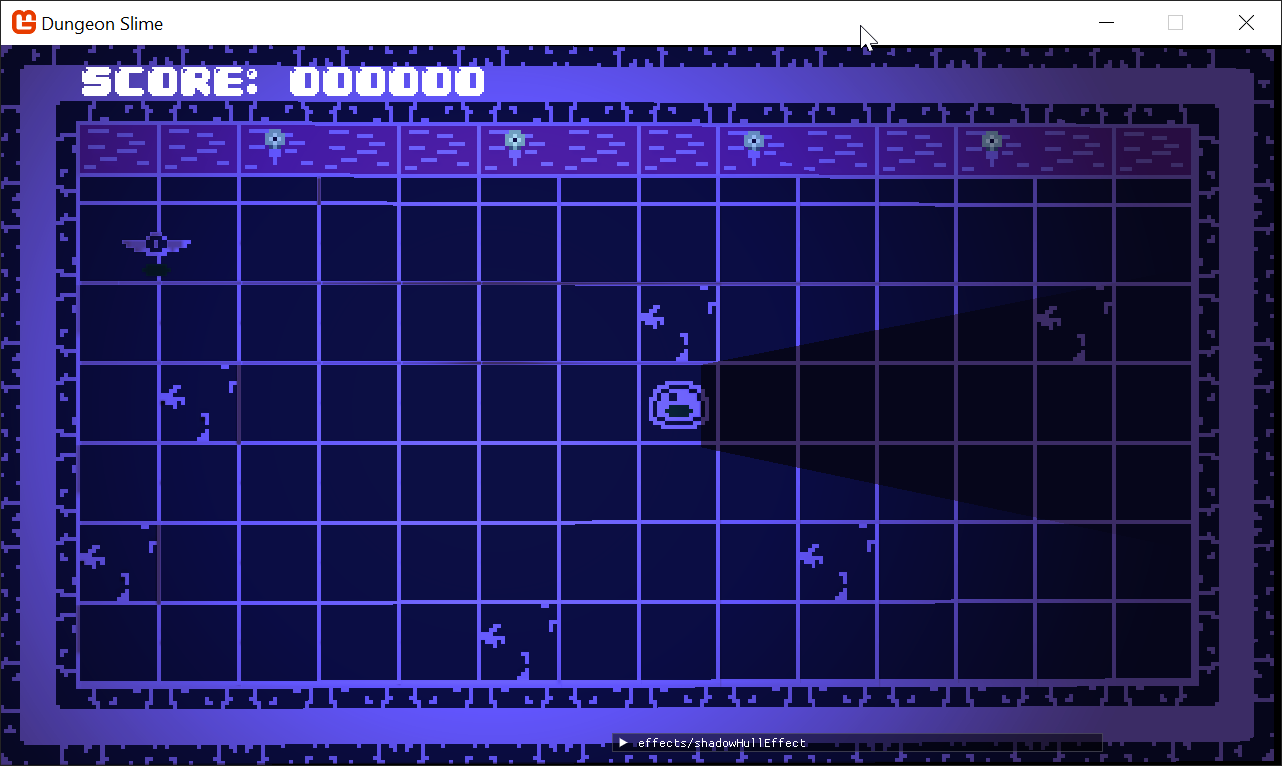 |
|---|
| Figure 9-14: A working shadow! |
Supporting DesktopGL and WindowsDX
Note
If you are using DesktopGL, you can skip this section entirely and move onto the next section. However, if your project targets WindowsDX, or if you want to learn how to support both DesktopGL and WindowsDX at the same time, read on!
If you have been following the tutorial series closely, but you are using WindowsDX (perhaps you experimented with RenderDoc back in Chapter 4), then you will have bumped into an error when you got to this step.
Your project will actually look like this:
 |
|---|
| Figure 9-15: WindowsDX |
The problem is that in WindowsDX (DirectX), the MonoGame shader compiler treats textures and samplers in a different way to DesktopGL (OpenGL). The reason the screenshot looks different is that the ShadowBufferSampler is accidentally getting texture data from the NormalBuffer, instead of the ShadowBuffer.
If you recall, in Chapter 8, we discussed how the SpriteBatch will automatically override the first sampler and texture in your shader. That quirk combines with a second quirk with WindowsDX that ultimately leads to the bug. In WindowsDX, the sampler2D type and tex2D function are not well supported, essentially, all sampler2D instances point to the first SamplerState, no matter what.
WindowsDX supports Shader Model 4.0, where as DesktopGL only supports Shader Model 3.0. The way textures work in Shader Model 4.0 is simply different than in Shader Model 3.0. To address this, we need to migrate our shader to be compatible with the new format.
This table shows how to do the same texture and sampler operations in DesktopGL and WindowsDX.
| DesktopGL | WindowsDX | |
|---|---|---|
| Declare Resources |
|
|
| Fetch Texture |
|
|
You could simply update your pointLightEffect.fx shader to follow these new guidelines, and your problem would be solved. For example, the declaration of the textures and samplers would look like this:
Texture2D NormalBuffer;
SamplerState NormalBufferSampler;

Texture2D ShadowBuffer;
SamplerState ShadowBufferSampler;
And then later, when you need to access those textures, it would look like this:
float4 normal = NormalBuffer.Sample(NormalBufferSampler, screenCoords);
float shadow = ShadowBuffer.Sample(ShadowBufferSampler, screenCoords).r;
And that would work! Give it a try! You should see your shadow materialize into view.
But wait, now if you change your project back to DesktopGL, you will see errors like this in the terminal:
Warning: cannot set shader parameter=[ShadowBuffer] because it does not exist in the compiled shader=[effects/pointLightEffect]
And worse, the effect is broken again.
We need a way to write the shader once, and have it work in both WindowsDX and DesktopGL. We can take a page out of MonoGame's book, because the core template SpriteEffect shader already does something like this. We discussed this briefly in Chapter 7, but every shader starts with this block by default:
#if OPENGL
    #define SV_POSITION POSITION
    #define VS_SHADERMODEL vs_3_0
    #define PS_SHADERMODEL ps_3_0
#else
    #define VS_SHADERMODEL vs_4_0_level_9_1
    #define PS_SHADERMODEL ps_4_0_level_9_1
#endif
The highlighted line is mapping the SV_POSITION semantic to something that is compatible with DesktopGL. We can do the same thing, and add a few shader macros. Our goal should be to write a few macros that automatically correct our existing shader code to work in WindowsDX with as little modification as possible.
Critically, we should only define the macros that convert the shader code to WindowsDX mode when the shader is not being compiled for DesktopGL.
First, we need to convert the
sampler2Dsyntax into the newerSamplerStateblock. This can be done with a straightforward replacement macro.#define sampler2D SamplerStateThen, we need to re-wire the
tex2Dfunction to use the newtexture.Sample()method syntax. This is a bit trickier, because our existing shadertex2D()invocations only reference the Sampler, but do not ever reference the texture directly. Instead, in the DesktopGL world, the sampler itself has the reference to the texture. Without the texture reference, whatever macro we write fortex2D()will not be able to infer the texture to use.Our approach will be to create a macro that defines a slightly new variant of
tex2D(), calledsampleTex2D().#define sampleTex2D(textureName, uv) textureName.Sample(textureName##Sampler, uv)The
sampleTex2D()macro takes the texture as the first parameter, where as thetex2D()function accepts the sampler as the first parameter. The macro infers the sampler name by concatenating "Sampler" onto the end of the texture variable name. This enforces a naming constraint on our samplers and textures, but fortunately, all of our shader code as followed this standard thus far.Note
Macros are powerful pre-processing tools that re-write your shader code before the shader is even compiled! The
##syntax is macro-speak for string concatenation.This approach is fairly common. MonoGame is open source, so we can go read the source code for some of the internal shader code. MonoGame uses the exact same technique to manage reading textures under different graphic backends, which is the same circumstance we find ourselves in, now.
The two macros we have created are good for when we are using WindowsDX, but we need to support the
sampleTex2D()expression in DesktopGL as well. All we need to do in this case is forward the parameters along totex2D():#define sample2D(textureName, uv) tex2D(textureName##Sampler, uv)The top block of the shader should look like this:
#if OPENGL
    #define SV_POSITION POSITION
    #define sample2D(textureName, uv) tex2D(textureName##Sampler, uv)
    #define VS_SHADERMODEL vs_3_0
    #define PS_SHADERMODEL ps_3_0
#else
    #define sample2D(textureName, uv) textureName.Sample(textureName##Sampler, uv)
    #define sampler2D SamplerState
    #define VS_SHADERMODEL vs_4_0_level_9_1
    #define PS_SHADERMODEL ps_4_0_level_9_1
#endif
We need to update the shader to use this new
sampleTex2D()macro instead of thetex2D():float4 MainPS(LightVertexShaderOutput input) : COLOR { // ... float shadow = sample2D(ShadowBuffer,screenCoords).r; float4 normal = sample2D(NormalBuffer,screenCoords); // ... }
And now, the shader should be working in WindowsDX, and in DesktopGL.
Note
MonoGame allows you to deploy your game for a lot of different platforms, like Windows, Mac, Linux, Mobile devices, and game consoles. However, different devices have different graphical requirements, and those requirements will end up forcing you to manage multiple graphics backends simultaneously (such as DesktopGL and WindowsDX). The MonoGame Discord and Github are fantastic places to ask questions about compatibility.
More Segments
So far, we have built up an implementation for the shadow caster system using a single line segment. Now, we will combine several line segments to create primitive shapes. We will also approximate the slime character as a hexagon.
Instead of only having
AandBin theShadowCasterclass, replace the class content to use aPositionand a List ofPoints:using System; using System.Collections.Generic; using Microsoft.Xna.Framework; namespace MonoGameLibrary.Graphics; public class ShadowCaster { /// <summary> /// The position of the shadow caster /// </summary> public Vector2 Position; /// <summary> /// A list of at least 2 points that will be used to create a closed loop shape. /// The points are relative to the position. /// </summary> public List<Vector2> Points; }Then, to create simple polygons add this method to the
ShadowCasterclass:public static ShadowCaster SimplePolygon(Point position, float radius, int sides) { var anglePerSide = MathHelper.TwoPi / sides; var caster = new ShadowCaster { Position = position.ToVector2(), Points = new List<Vector2>(sides) }; for (var angle = 0f; angle < MathHelper.TwoPi; angle += anglePerSide) { var pt = radius * new Vector2(MathF.Cos(angle), MathF.Sin(angle)); caster.Points.Add(pt); } return caster; }Swapping over to the
GameSceneclass, in theInitializeLights()method, instead of constructing aShadowCasterwith theAandBproperties, we can use the newSimplePolygonmethod:private void InitializeLights() { // ... // Replace this with the new List approach below //_shadowCasters.Add(new ShadowCaster //{ // A = new Vector2(700, 320), // B = new Vector2(700, 400) // }); // simple shadow caster _shadowCasters.Add(ShadowCaster.SimplePolygon(_slime.GetBounds().Location, radius: 30, sides: 6)); }Finally, the last place we need to change is the
DrawShadowBuffer()method in thePointLightclass. Currently it is just drawing a single pixel with theShadowHullMaterial, but now we need to draw a pixel per line segment.In the
PointLightclass, update theforeachblock to loop over all the points in theShadowCaster, and connect the points as line segments:public void DrawShadowBuffer(List<ShadowCaster> shadowCasters) { /// ... foreach (var caster in shadowCasters) { for (var i = 0; i < caster.Points.Count; i++) { var a = caster.Position + caster.Points[i]; var b = caster.Position + caster.Points[(i + 1) % caster.Points.Count]; var aToB = (b - a) / screenSize; var packed = PackVector2_SNorm(aToB); Core.SpriteBatch.Draw(Core.Pixel, a, packed); } } // ... }When you run the game, you will see a larger shadow shape.
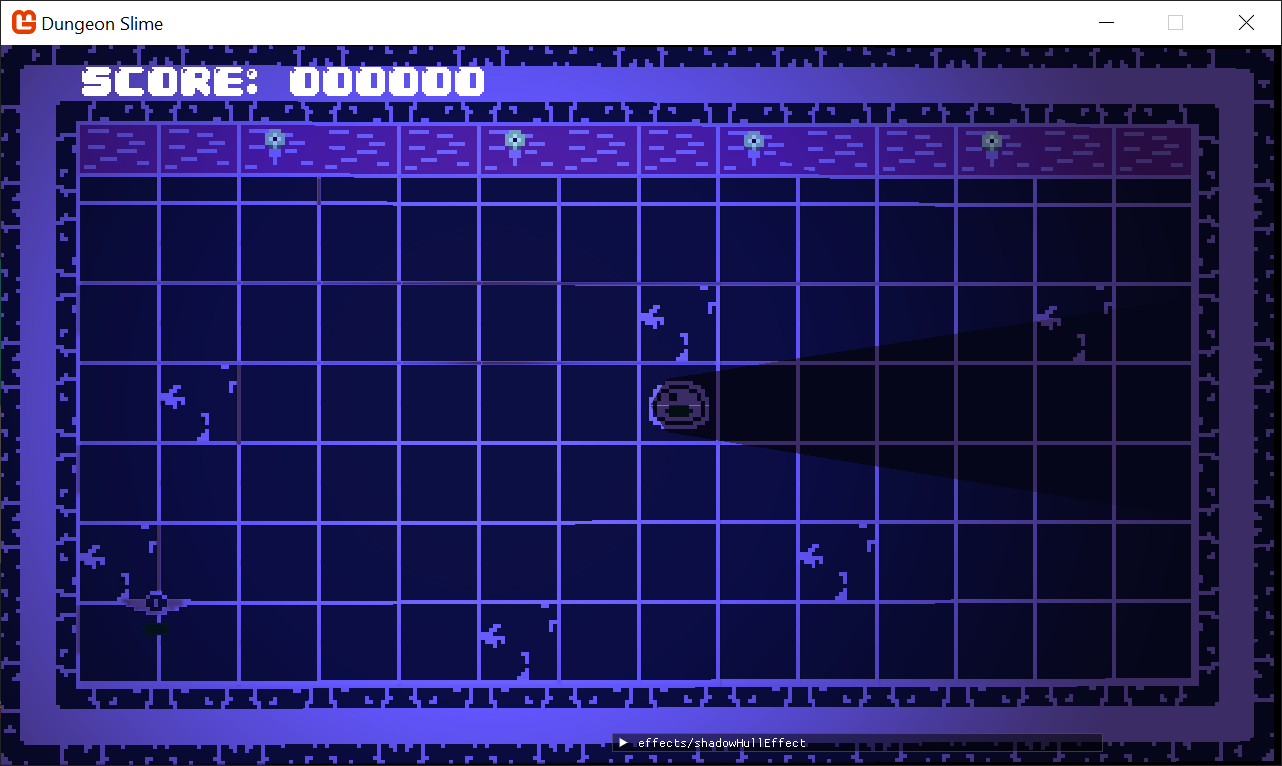
Figure 9-16: A shadow hull from a hexagon There are a few problems with the current effect. First off, there is a visual artifact going horizontally through the center of the shadow caster where it appears light is "leaking" in. This is likely due to numerical accuracy issues in the shader. A simple solution is to slightly extend the line segment in the vertex shader.
In the
shadowHullEffect.fxshader, after bothAandBare calculated, but beforeaandb, add this to the shader:VertexShaderOutput ShadowHullVS(VertexShaderInput input) { // ... float2 aToB = UnpackVector2FromColor_SNorm(input.Color) * ScreenSize; float2 B = A + aToB; float2 direction = normalize(aToB); A -= direction; // move A back along the segment by one unit B += direction; // move B forward along the segment by one unit float2 lightRayA = normalize(A - LightPosition); float2 a = A + distance * lightRayA; float2 lightRayB = normalize(B - LightPosition); float2 b = B + distance * lightRayB; // ... }And now the visual artifact has gone away.
Figure 9-17: The visual artifact has been fixed The next item to consider in the
ShadowHullEffectshader, is that the "inside" of the slime is not being lit. All of the segments are casting shadows, but it would be nice if only the segments on the far side of the slime cast shadows. We can take advantage of the fact that all of the line segments making up the shadow caster are wound in the same direction:Add the following immediately after the previous addition in the
ShadowHullEffectshader:// cull faces float2 normal = float2(-direction.y, direction.x); float alignment = dot(normal, (LightPosition - A)); if (alignment < 0){ modified.Color.a = -1; }Tip
This technique is called back-face culling.
Then in the pixel shader function, add this line to the top. The
clipfunction will completely discard the fragment and not draw anything to theShadowBuffer:float4 MainPS(VertexShaderOutput input) : COLOR { clip(input.Color.a); return float4(0,0,0,1); // return black }
Now the slime looks well lit and shadowed! In the next section, we will line up the lights and shadows with the rest of the level.
 |
|---|
| Figure 9-18: The slime is well lit |
Gameplay
Now that we can draw shadows in the lighting system, we should rig up shadows to the slime, the bat, and the walls of the dungeon.
First, start by adding back the
InitializeLights()method in theGameSceneclass as it existed at the start of the chapter. Feel free to add or remove lights as you see fit. Here is a version of the function:private void InitializeLights() { // torch 1 _lights.Add(new PointLight { Position = new Vector2(260, 100), Color = Color.CornflowerBlue, Radius = 500 }); // torch 2 _lights.Add(new PointLight { Position = new Vector2(520, 100), Color = Color.CornflowerBlue, Radius = 500 }); // torch 3 _lights.Add(new PointLight { Position = new Vector2(740, 100), Color = Color.CornflowerBlue, Radius = 500 }); // torch 4 _lights.Add(new PointLight { Position = new Vector2(1000, 100), Color = Color.CornflowerBlue, Radius = 500 }); // random lights _lights.Add(new PointLight { Position = new Vector2(Random.Shared.Next(50, 400),400), Color = Color.MonoGameOrange, Radius = 500 }); _lights.Add(new PointLight { Position = new Vector2(Random.Shared.Next(650, 1200),300), Color = Color.MonoGameOrange, Radius = 500 }); }Now, we will focus on the slime shadows. Add a new
List<ShadowCaster>property to theSlimeclass:/// <summary> /// A list of shadow casters for all of the slime segments /// </summary> public List<ShadowCaster> ShadowCasters { get; private set; } = new List<ShadowCaster>();And in the
Slime'sUpdate()method, add this snippet:public void Update(GameTime gameTime) { // ... // Update the shadow casters if (ShadowCasters.Count != _segments.Count) { ShadowCasters = new List<ShadowCaster>(_segments.Count); for (var i = 0; i < _segments.Count; i++) { ShadowCasters.Add(ShadowCaster.SimplePolygon(Point.Zero, radius: 30, sides: 12)); } } // move the shadow casters to the current segment positions for (var i = 0; i < _segments.Count; i++) { var segment = _segments[i]; Vector2 pos = Vector2.Lerp(segment.At, segment.To, _movementProgress); var size = new Vector2(_sprite.Width, _sprite.Height); ShadowCasters[i].Position = pos + size * .5f; } }Now, modify the
GameScene'sDraw()method to replace the existingPointLight.DrawShadowscall and create a master list of all theShadowCastersand pass that into theDrawShadows()function:public override void Draw(GameTime gameTime) { // ... // Always end the sprite batch when finished. Core.SpriteBatch.End(); // Remove this line: //PointLight.DrawShadows(_lights, _shadowCasters); // render the shadow buffers var casters = new List<ShadowCaster>(); casters.AddRange(_shadowCasters); casters.AddRange(_slime.ShadowCasters); PointLight.DrawShadows(_lights, casters); // start rendering the lights _deferredRenderer.StartLightPhase(); PointLight.Draw(Core.SpriteBatch, _lights, _deferredRenderer.NormalBuffer); // ... }
And now the slime has shadows around the segments!
Note
You can remove the return; from the Update method in the GameScene class to resume normal gameplay and see the shadows in operation.
| Figure 9-19: The slime has shadows |
Next up, the bat needs some shadows!
Add a
ShadowCasterproperty to theBatclass:/// <summary> /// The shadow caster for this bat /// </summary> public ShadowCaster ShadowCaster { get; private set; }And instantiate it in the constructor:
public Bat(AnimatedSprite sprite, SoundEffect bounceSoundEffect)
{
    // ...

    ShadowCaster = ShadowCaster.SimplePolygon(Point.Zero, radius: 10, sides: 12);
}
In the
Bat'sUpdate()method, update the position of theShadowCaster:public void Update(GameTime gameTime) { // ... // Update the position of the shadow caster. Move it up a bit due to the bat's artwork. var size = new Vector2(_sprite.Width, _sprite.Height); ShadowCaster.Position = Position - Vector2.UnitY * 10 + size * .5f; }And finally add the
ShadowCasterto the master list of shadow casters during theGameScene'sDraw()method together with the slimes shadows:// render the shadow buffers var casters = new List<ShadowCaster>(); casters.AddRange(_shadowCasters); casters.AddRange(_slime.ShadowCasters); casters.Add(_bat.ShadowCaster); PointLight.DrawShadows(_lights, casters);
And now the bat is casting a shadow as well!
| Figure 9-20: The bat casts a shadow |
Lastly, the walls should cast shadows to help ground the lighting in the world.
Add a shadow caster in the InitializeLights() function to represent the edge of the playable tiles:
private void InitializeLights()
{
    // ...

    var tileUnit = new Vector2(_tilemap.TileWidth, _tilemap.TileHeight);
    var size = new Vector2(_tilemap.Columns, _tilemap.Rows);
    _shadowCasters.Add(new ShadowCaster
    {
        Points = new List<Vector2>
        {        tileUnit * new Vector2(1, 1),
            tileUnit * new Vector2(size.X - 1, 1),
            tileUnit * new Vector2(size.X - 1, size.Y - 1),
            tileUnit * new Vector2(1, size.Y - 1),
        }
    });
}
| Figure 9-21: The walls have shadows |
The Stencil Buffer
Note
The DirectX compatible approach.
The light and shadow system is working! However, there is a non-trivial amount of memory overhead for the effect. Every light has a full screen sized ShadowBuffer. At the moment, each ShadowBuffer is a RenderTarget2D with 32 bits of data per pixel. At our screen resolution of 1280 x 720, that means every light adds roughly (1280 * 720 * 32bits) 3.6 MB of overhead to the game! Our system is not taking full advantage of those 32 bits per pixel. Instead, all we really need is a single bit, for "in shadow" or "not in shadow". In fact, all the ShadowBuffer is doing is operating as a mask for the point light.
Image masking is a common task in computer graphics and there is a built-in feature of MonoGame called the Stencil Buffer that handles image masking without the need for any custom RenderTarget or shader logic. In fact, we will be able to remove a lot of the existing code and leverage the stencil instead.
The stencil buffer is a part of an existing RenderTarget, but we need to opt into using it. In the DeferredRenderer class, where the LightBuffer is being instantiated, to do this we apply the following:
In the
DeferredRendererclass, change thepreferredDepthFormattoDepthFormat.Depth24Stencil8in theDeferredRendererclass for the LightBuffer:LightBuffer = new RenderTarget2D( graphicsDevice: Core.GraphicsDevice, width: viewport.Width, height: viewport.Height, mipMap: false, preferredFormat: SurfaceFormat.Color, preferredDepthFormat: DepthFormat.Depth24Stencil8);
The LightBuffer itself has 32 bits per pixel of Color data, and an additional 32 bits of data split between the depth and stencil buffers. As the name suggests, the Depth24Stencil8 format grants the depth buffer 24 bits of data, and the stencil buffer 8 bits of data. 8 bits are enough for a single byte, which means it can represent integers from 0 to 255.
For our use case, we will deal with the stencil buffer in two distinct steps.
- First, all of the shadow hulls will be drawn into the "Stencil Buffer" instead of a unique
ShadowBuffer. Anywhere a shadow hull is drawn, the stencil buffer will have a value of1, and anywhere without a shadow hull will have a value of0. - Then, in the second step, when the point lights are drawn, the stencil buffer can be used as a mask where pixels are only drawn where the stencil buffer has a value of
0(which means there was no shadow hull present in the previous step).
The stencil buffer can be cleared and re-used between each light, so there is no need to have a buffer per light. We will be able to completely remove the ShadowBuffer from the PointLight class. That also means we will not need to send the ShadowBuffer to the point light shader or read from it in shader code any longer.
To get started, create a new method in the
DeferredRendererclass calledDrawLights(). This new method is going to completely replace some of our existing methods, but we will clean the unnecessary ones up when we are done with the new approach:public void DrawLights(List<PointLight> lights, List<ShadowCaster> shadowCasters) { // }Add a using for the
System.Collections.Genericnamespace to support the newListtype:using System.Collections.Generic;In the
GameScene'sDraw()method, call the newDrawLights()method instead of theDrawShadows(),StartLightPhase()andPointLight.Draw()methods. Here is a snippet of theDraw()method:public override void Draw(GameTime gameTime) { // ... // render the shadow buffers var casters = new List<ShadowCaster>(); casters.AddRange(_shadowCasters); casters.AddRange(_slime.ShadowCasters); casters.Add(_bat.ShadowCaster); // Remove these // PointLight.DrawShadows(_lights, casters); // _deferredRenderer.StartLightPhase(); // PointLight.Draw(Core.SpriteBatch, _lights, _deferredRenderer.NormalBuffer); // start rendering the lights _deferredRenderer.DrawLights(_lights, casters); // finish the deferred rendering _deferredRenderer.Finish(); // ... }Next, in the
pointLightEffect.fxshader, we will not be using theShadowBufferanymore, so remove:- The
Texture2D ShadowBuffer - The
sampler2D ShadowBufferSampler - Remove the
tex2Dread from the shadow image - And the final multiplication of the
shadow.
The end of the
pointLightEffect.fxshader should read as follows:float4 MainPS(LightVertexShaderOutput input) : COLOR { // ... // how much is the normal direction pointing towards the light direction? float lightAmount = (dot(normalDir, lightDir)); float4 color = input.Color; color.a *= falloff * lightAmount; return color; }- The
If you run the game now, you will not see any of the lights anymore.
 |
|---|
| Figure 9-22: Back to square one |
In the new DrawLights() method of the DeferredRenderer class, we need to iterate over all the lights, and draw them.
First, we need to set the current render target to the
LightBufferso it can be used in the deferred renderer composite stage:public void DrawLights(List<PointLight> lights, List<ShadowCaster> shadowCasters) { Core.GraphicsDevice.SetRenderTarget(LightBuffer); Core.GraphicsDevice.Clear(Color.Black); foreach (var light in lights) { Core.SpriteBatch.Begin( effect: Core.PointLightMaterial.Effect, blendState: BlendState.Additive ); var diameter = light.Radius * 2; var rect = new Rectangle( (int)(light.Position.X - light.Radius), (int)(light.Position.Y - light.Radius), diameter, diameter); Core.SpriteBatch.Draw(NormalBuffer, rect, light.Color); Core.SpriteBatch.End(); } }Now the lights are back, but of course no shadows yet.
Figure 9-23: Welcome back, lights As each light is about to draw, we need to draw the shadow hulls. To achieve this, replace the
DrawLightsmethod with the following, this updates:- An updated
foreachloop to handle each lights shadows. - Moves the drawing of the final buffer after all the lights/shadows are drawn.
public void DrawLights(List<PointLight> lights, List<ShadowCaster> shadowCasters)
{
    Core.GraphicsDevice.SetRenderTarget(LightBuffer);
    Core.GraphicsDevice.Clear(Color.Black);

    foreach (var light in lights)
    {
        var diameter = light.Radius * 2;
        var rect = new Rectangle(
            (int)(light.Position.X - light.Radius),
            (int)(light.Position.Y - light.Radius),
            diameter, diameter);

        Core.ShadowHullMaterial.SetParameter("LightPosition", light.Position);
        Core.SpriteBatch.Begin(
            effect: Core.ShadowHullMaterial.Effect,
            blendState: BlendState.Opaque,
            rasterizerState: RasterizerState.CullNone
        );

        foreach (var caster in shadowCasters)
        {
            for (var i = 0; i < caster.Points.Count; i++)
            {
                var a = caster.Position + caster.Points[i];
                var b = caster.Position + caster.Points[(i + 1) % caster.Points.Count];

                var screenSize = new Vector2(LightBuffer.Width, LightBuffer.Height);
                var aToB = (b - a) / screenSize;
                var packed = PointLight.PackVector2_SNorm(aToB);
                Core.SpriteBatch.Draw(Core.Pixel, a, packed);
            }
        }
        Core.SpriteBatch.End();

        Core.SpriteBatch.Begin(
            effect: Core.PointLightMaterial.Effect,
            blendState: BlendState.Additive
        );

        Core.SpriteBatch.Draw(NormalBuffer, rect, light.Color);
        Core.SpriteBatch.End();
    }
}
This produces strange results. So far, the stencil buffer is not being used yet, so all we are doing is rendering the shadow hulls onto the same image as the light data itself. Worse, the alternating order from rendering shadows to lights, back to shadows, and so on produces very visually decoherent results.
Note
If the
Updateloop is disabled, you might not see the shadows, the game needs to run for a frame or two (as the materials need to update at least once) in order for them to be drawn, so let it play and then pause to check it out.It will help if you re-add the pause mechanic from the last chapter to let the game run and pause it to test.
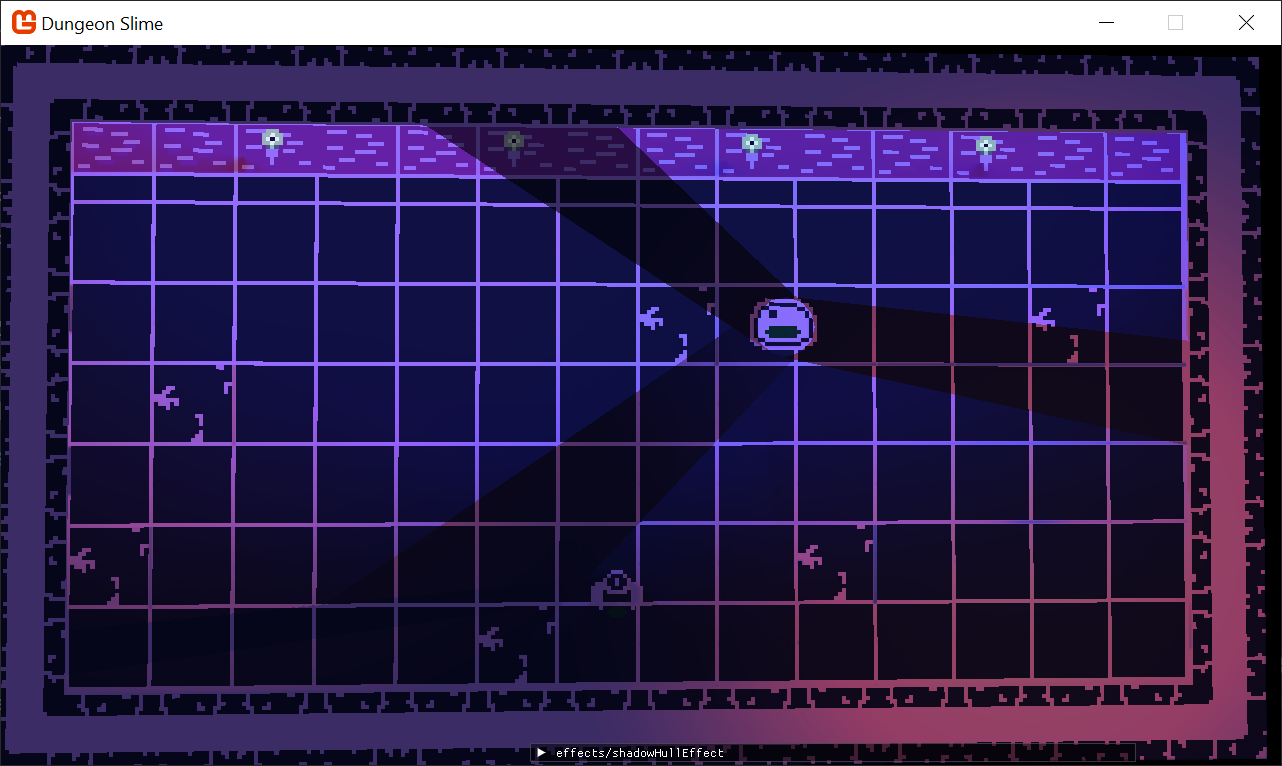
Figure 9-24: Worse shadows Instead of writing the shadow hulls as color into the color portion of the
LightBuffer, we only need to render the1or0to the stencil buffer portion of theLightBuffer. To do this, we need to create a newDepthStencilStatevariable. TheDepthStencilStateis a MonoGame primitive that describes how draw call operations should interact with the stencil buffer.- An updated
Create a new variable in the
DeferredRendererclass:/// <summary> /// The state used when writing shadow hulls /// </summary> private DepthStencilState _stencilWrite;And initialize it in the constructor:
_stencilWrite = new DepthStencilState
{
    // instruct MonoGame to use the stencil buffer
    StencilEnable = true,

    // instruct every fragment to interact with the stencil buffer
    StencilFunction = CompareFunction.Always,

    // every operation will replace the current value in the stencil buffer
    //  with whatever value is in the ReferenceStencil variable
    StencilPass = StencilOperation.Replace,

    // this is the value that will be written into the stencil buffer
    ReferenceStencil = 1,

    // ignore depth from the stencil buffer write/reads
    DepthBufferEnable = false
};
The
_stencilWritevariable is a declarative structure that tells MonoGame how the stencil buffer should be used during aSpriteBatchdraw call. The next step is to actually pass the_stencilWritedeclaration into theSpriteBatch'sDrawLights()call in theDeferredRendererclass when the shadow hulls are being rendered:public void DrawLights(List<PointLight> lights, List<ShadowCaster> shadowCasters) { // ... Core.ShadowHullMaterial.SetParameter("LightPosition", light.Position); Core.SpriteBatch.Begin( depthStencilState: _stencilWrite, effect: Core.ShadowHullMaterial.Effect, blendState: BlendState.Opaque, rasterizerState: RasterizerState.CullNone ); foreach (var caster in shadowCasters) // ... }Unfortunately, there is not a good way to visualize the state of the stencil buffer, so if you run the game, it is hard to tell if the stencil buffer contains any data. Instead, we will try and use the stencil buffer's data when the point lights are drawn. The point lights will not interact with the stencil buffer in the same way the shadow hulls did.
To capture the new behavior, create a second
DepthStencilStateclass variable in theDeferredRendererclass:/// <summary> /// The state used when drawing point lights /// </summary> private DepthStencilState _stencilTest;And initialize it in the constructor:
_stencilTest = new DepthStencilState
{
    // instruct MonoGame to use the stencil buffer
    StencilEnable = true,

    // instruct only fragments that have a current value EQUAl to the
    //  ReferenceStencil value to interact
    StencilFunction = CompareFunction.Equal,

    // shadow hulls wrote `1`, so `0` means "not" shadow.
    ReferenceStencil = 0,

    // do not change the value of the stencil buffer. KEEP the current value.
    StencilPass = StencilOperation.Keep,

    // ignore depth from the stencil buffer write/reads
    DepthBufferEnable = false
};
And now pass the new
_stencilTeststate to theSpriteBatchDrawLights()call that draws the point lights:public void DrawLights(List<PointLight> lights, List<ShadowCaster> shadowCasters) { // ... Core.SpriteBatch.End(); Core.SpriteBatch.Begin( depthStencilState: _stencilTest, effect: Core.PointLightMaterial.Effect, blendState: BlendState.Additive ); Core.SpriteBatch.Draw(NormalBuffer, rect, light.Color); Core.SpriteBatch.End(); // ... }The shadows look better, but something is still broken. It looks eerily similar to the previous iteration before passing the
_stencilTestand_stencilWritedeclarations toSpriteBatch...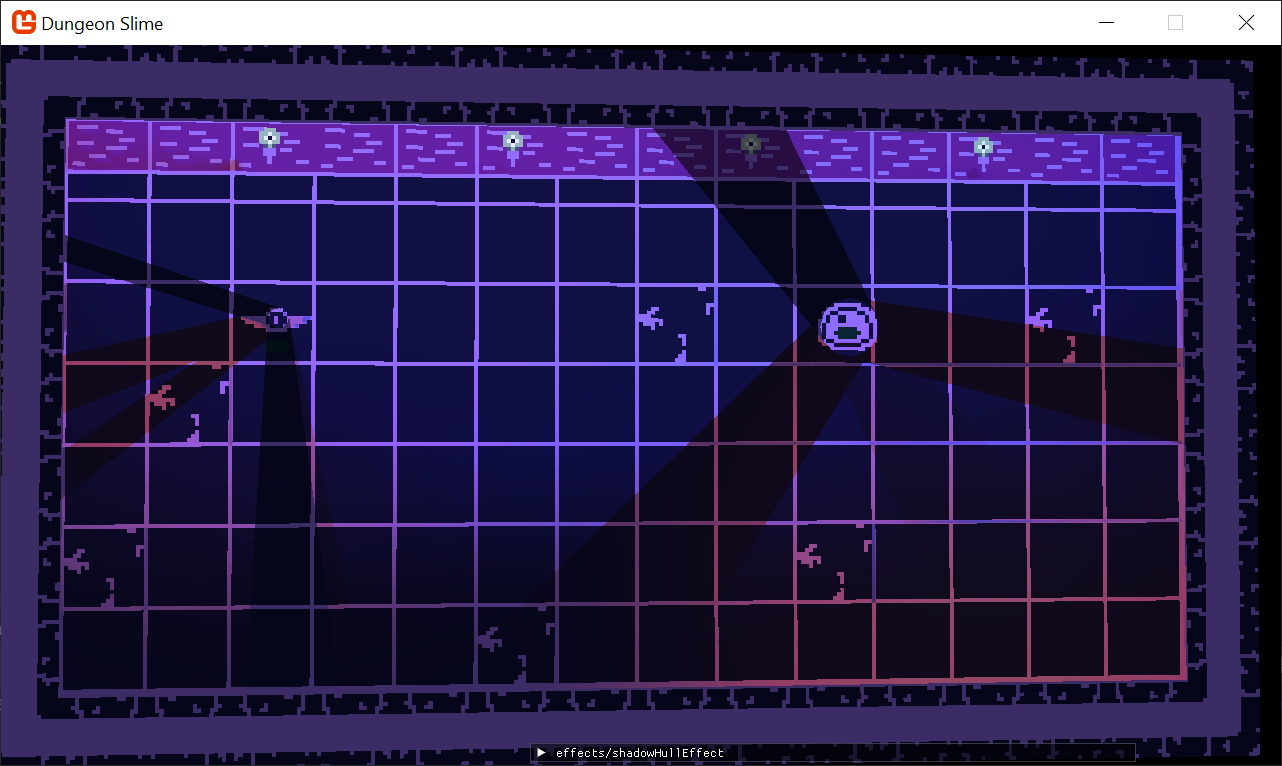
Figure 9-25: The shadows still look funky This happens because the shadow hulls are still being drawn as colors into the
LightBuffer. The shadow hull shader is rendering a black pixel, so those black pixels are drawing on top of theLightBuffer's previous point lights. To solve this, we need to create a customBlendStatethat ignores all color channel writes.Create another new variable in the
DeferredRenderer:/// <summary> /// A custom blend state that wont write any color data /// </summary> private BlendState _shadowBlendState;And initialize it in the constructor:
_shadowBlendState = new BlendState
{
    // no color channels will be written into the render target
    ColorWriteChannels = ColorWriteChannels.None
};
Tip
Setting the
ColorWriteChannelsto.Nonemeans that the GPU still rasterizes the geometry, but no color will be written to theLightBuffer.Finally, pass it to the shadow hull
SpriteBatchcall:public void DrawLights(List<PointLight> lights, List<ShadowCaster> shadowCasters) { // ... Core.ShadowHullMaterial.SetParameter("LightPosition", light.Position); Core.SpriteBatch.Begin( depthStencilState: _stencilWrite, effect: Core.ShadowHullMaterial.Effect, blendState: _shadowBlendState, rasterizerState: RasterizerState.CullNone ); foreach (var caster in shadowCasters) // ... }Now the shadows look closer, but there is one final issue.
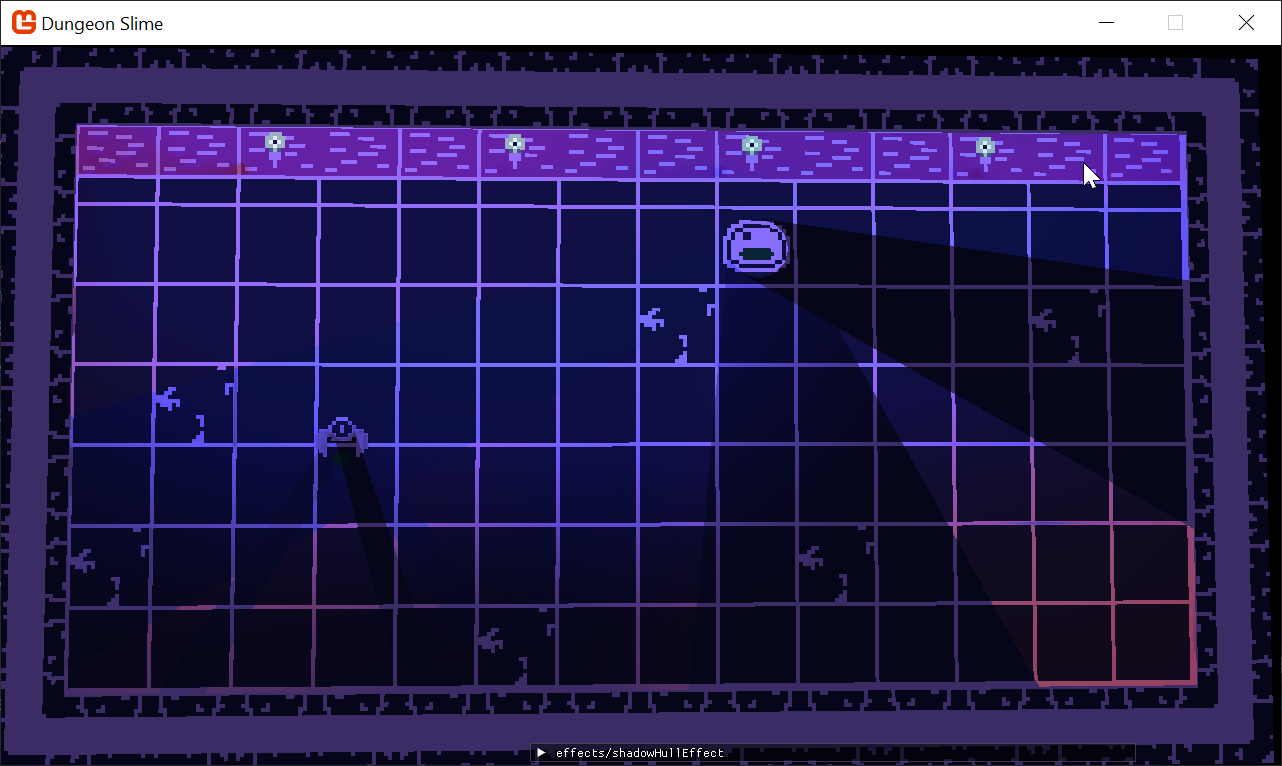
Figure 9-26: The shadows are back The
LightBufferis only being cleared at the start of the entireDrawLights()method. This means the8bits for the stencil data are not being cleared between lights, so shadows from one light are overwriting into all subsequent lights.To fix this, we just need to clear the stencil buffer data in the
DrawLightsmethod before rendering the shadow hulls:public void DrawLights(List<PointLight> lights, List<ShadowCaster> shadowCasters) { Core.GraphicsDevice.SetRenderTarget(LightBuffer); Core.GraphicsDevice.Clear(Color.Black); foreach (var light in lights) { var diameter = light.Radius * 2; var rect = new Rectangle( (int)(light.Position.X - light.Radius), (int)(light.Position.Y - light.Radius), diameter, diameter); Core.GraphicsDevice.Clear(ClearOptions.Stencil, Color.Black, 0, 0); Core.ShadowHullMaterial.SetParameter("LightPosition", light.Position); // ... } // ... }
And now the shadows are working again! The current state of the new DrawLights() method is written below:
public void DrawLights(List<PointLight> lights, List<ShadowCaster> shadowCasters)
{
    Core.GraphicsDevice.SetRenderTarget(LightBuffer);
    Core.GraphicsDevice.Clear(Color.Black);

    foreach (var light in lights)
    {
        var diameter = light.Radius * 2;
        var rect = new Rectangle(
            (int)(light.Position.X - light.Radius),
            (int)(light.Position.Y - light.Radius),
            diameter, diameter);

        Core.GraphicsDevice.Clear(ClearOptions.Stencil, Color.Black, 0, 0);

        Core.ShadowHullMaterial.SetParameter("LightPosition", light.Position);
        Core.SpriteBatch.Begin(
            depthStencilState: _stencilWrite,
            effect: Core.ShadowHullMaterial.Effect,
            blendState: _shadowBlendState,
            rasterizerState: RasterizerState.CullNone
        );

        foreach (var caster in shadowCasters)
        {
            for (var i = 0; i < caster.Points.Count; i++)
            {
                var a = caster.Position + caster.Points[i];
                var b = caster.Position + caster.Points[(i + 1) % caster.Points.Count];

                var screenSize = new Vector2(LightBuffer.Width, LightBuffer.Height);
                var aToB = (b - a) / screenSize;
                var packed = PointLight.PackVector2_SNorm(aToB);
                Core.SpriteBatch.Draw(Core.Pixel, a, packed);
            }
        }
        Core.SpriteBatch.End();

        Core.SpriteBatch.Begin(
            depthStencilState: _stencilTest,
            effect: Core.PointLightMaterial.Effect,
            blendState: BlendState.Additive
        );

        Core.SpriteBatch.Draw(NormalBuffer, rect, light.Color);
        Core.SpriteBatch.End();
    }
}
| Figure 9-27: Lights using the stencil buffer |
We can now remove a lot of unnecessary code.
- The
DeferredRenderer.StartLightPhase()function is no longer called. Remove it. - The
PointLight.DrawShadows()function is no longer called. Remove it. - The
PointLight.Draw()function is no longer called. Remove it. - The
PointLight.DrawShadowBuffer()function is no longer called. Remove it. - The
PointLight.ShadowBufferRenderTarget2Dis no longer used. Remove it. Anywhere that referenced theShadowBuffercan also be removed, such as the constructor.
Improving the Look and Feel
The shadow technique we have developed looks cool, but the visual effect leaves a lot to be desired. The shadows look sort of like dark polygons being drawn on top of the scene, rather than what they actually are, which is the absence of light in certain areas. Part of the problem is that the shadows have hard edges, and in real life, shadows fade smoothly across the boundary between light and darkness. Unfortunately for us, creating physically accurate shadows with soft edges is hard. There are lots of techniques you could try, like this technique for rendering penumbra geometry, or using 1d shadow maps.
Note
The 1d shadow mapping article references a classic article by Catalin Zima, that seems to have fallen off the internet. Luckily the Internet Archive has it available, here
Soft shadow techniques are out of the scope of this tutorial, so we will need to find other ways to improve the look and feel of our hard-edged shadows. The first thing to do is let go of the need for "physically accurate" shadows. Our 2d Dungeon Slime game is not physically accurate anyway, so the shadows do not need to be either.
Less Is More
The first thing to do is make fewer lights. This is a personal choice, but I find that the lights we added earlier in the chapter are cool, but they are distracting. With so many lights it causes a lot of shadows, and as the shadows move around, they distract you from the main object of the game, eating bats.
Originally, we added 4 lights at the top of the level because there were already 4 torches in the game world, so let us simplify that first. Remove the two center torches by modifying the
tilemap-definition.xmlin theDungeonSlimeContent/Images folder:<?xml version="1.0" encoding="utf-8"?> <Tilemap> <Tileset region="260 0 80 80" tileWidth="20" tileHeight="20">images/atlas</Tileset> <Tiles> 00 01 02 01 02 01 02 01 02 01 02 01 02 01 02 03 04 05 05 06 05 05 05 05 05 05 05 05 06 05 05 07 08 09 09 09 09 09 09 09 09 09 09 09 09 09 09 11 04 09 09 09 09 09 09 09 10 09 09 09 09 10 09 07 08 09 10 09 09 09 09 09 09 09 09 09 09 09 09 11 04 09 09 09 09 09 09 09 09 09 09 09 09 09 09 07 08 10 09 09 09 09 09 09 09 09 10 09 09 09 09 11 04 09 09 09 09 09 10 09 09 09 09 09 09 09 09 07 12 13 14 13 14 13 14 13 14 13 14 13 14 13 14 15 </Tiles> </Tilemap>Next we will update the
InitializeLights()method in theGameSceneclass to simplify our point lights:- Remove the center lights that were over the two wall lights we have omitted.
- Replace the 2 moving lights for a single large light that sits at the bottom of the level.
- We can also get rid of the shadow caster for the walls of the level.
Here is the updated
InitializeLights()method:private void InitializeLights() { // torch 1 _lights.Add(new PointLight { Position = new Vector2(260, 100), Color = Color.CornflowerBlue, Radius = 600 }); // torch 2 _lights.Add(new PointLight { Position = new Vector2(1000, 100), Color = Color.CornflowerBlue, Radius = 600 }); // underlight _lights.Add(new PointLight { Position = new Vector2(600, 660), Color = Color.MonoGameOrange, Radius = 1200 }); }Also Remove the
MoveLightsAround()method and its call fromUpdateas well to keep things simple.
Now there is less visual shadow noise going on.
| Figure 9-28: Fewer lights mean fewer shadows |
Blur the Shadows
Next it would be nice to blur the edges of the shadows. so they are more like softer shadows, without having to do the hard work of calculating per pixel soft shadows. One easy way to blur the shadows is to blur the LightBuffer when we are reading it in the final deferred rendering composite shader.
We will be using a simple blur technique called box blur.
Add this snippet to your
deferredCompositeEffect.fx:float2 ScreenSize; float BoxBlurStride; float4 Blur(float2 texCoord) { float4 color = float4(0, 0, 0, 0); float2 texelSize = 1 / ScreenSize; int kernalSize = 1; float stride = BoxBlurStride * 30; // allow the stride to range up a size of 30 for (int x = -kernalSize; x <= kernalSize; x++) { for (int y = -kernalSize; y <= kernalSize; y++) { float2 offset = float2(x, y) * texelSize * stride; color += tex2D(LightBufferSampler, texCoord + offset); } } int totalSamples = pow(kernalSize*2+1, 2); color /= totalSamples; color.a = 1; return color; }Then, in the
MainPSfunction of the shader, instead of reading theLightBufferdirectly, get the value from the newBlurfunction.float4 MainPS(VertexShaderOutput input) : COLOR { float4 color = tex2D(SpriteTextureSampler,input.TextureCoordinates) * input.Color; float4 light = Blur(input.TextureCoordinates) * input.Color; float3 toneMapped = light.xyz / (.5 + dot(light.xyz, float3(0.299, 0.587, 0.114))); light.xyz = toneMapped; light = saturate(light + AmbientLight); return color * light; }Warning
Remember that function declaration order matters in shader languages. Make sure the
Blur()function is defined above theMainPS()function, otherwise you will get a compiler error.Notice that the box
Blurfunction needs access to theScreenSize, which we need to set in theCore'sUpdate()method:protected override void Update(GameTime gameTime) { // ... DeferredCompositeMaterial.SetParameter("ScreenSize", new Vector2(GraphicsDevice.Viewport.Width, GraphicsDevice.Viewport.Height)); DeferredCompositeMaterial.Update(); base.Update(gameTime); }Now, as we adjust the
BoxBlurStridesize, we can see the shadows blur in and out.Note
We could get higher quality blur by increasing the
kernelSizein the shadow, but that comes at the cost of runtime performance.Figure 9-29: Blurring the shadows Note
If you are not seeing the ImGui window for the
deferredCompositeEffect, make sure to add back in theDeferredCompositeMaterial.IsDebugVisible = true;setting in theCore'sLoadContentmethod.It is up to you to find a
BoxBlurStridevalue that fits your preference, but I like something around.18, set the value just after theScreenSizeparameter in theCoreclass'sUpdatemethod:
DeferredCompositeMaterial.SetParameter("BoxBlurStride", .18f);
Shadow Length
The next visual puzzle is that sometimes the shadow projections look unnatural. The shadows look too long. It would be nice to have some artistic control over how long the shadow hulls should be. Ideally, the hulls could be faded out at some distance away from the shadow caster. However, our shadows are using the stencil buffer to literally clip fragments out of the lights, and the stencil buffer cannot be "faded" in the traditional sense.
There is a technique called dithering, which fakes a gradient by alternating pixels on and off. The image below is from Wikipedia's article on dithering. The image only has two colors, white and black. The image looks shaded, but it is just in the art of spacing the black pixels further and further away in the brighter areas.
 |
|---|
| Figure 9-30: An example of a dithered image |
We can use the same dithering technique in the shadowHullEffect.fx file. If we had a gradient value, we could dither that value to decide if the fragment should be clipped or not.
Add the following snippet to the
shadowHullEffect.fxfile,// Bayer 4x4 values normalized static const float bayer4x4[16] = { 0.0/16.0, 8.0/16.0, 2.0/16.0, 10.0/16.0, 12.0/16.0, 4.0/16.0, 14.0/16.0, 6.0/16.0, 3.0/16.0, 11.0/16.0, 1.0/16.0, 9.0/16.0, 15.0/16.0, 7.0/16.0, 13.0/16.0, 5.0/16.0 }; float ShadowFadeStartDistance; float ShadowFadeEndDistance;And update the
MainPSfunction to the following:float4 MainPS(VertexShaderOutput input) : COLOR { // get an ordered dither value int2 pixel = int2(input.TextureCoordinates * ScreenSize); int idx = (pixel.x % 4) + (pixel.y % 4) * 4; float ditherValue = bayer4x4[idx]; // produce the fade-out gradient float maxDistance = ScreenSize.x + ScreenSize.y; float endDistance = ShadowFadeEndDistance; float startDistance = ShadowFadeStartDistance; float fade = saturate((input.TextureCoordinates.x - endDistance) / (startDistance - endDistance)); if (ditherValue > fade) { clip(-1); } clip(input.Color.a); return float4(0,0,0,1); // return black }Note
Why use
input.TextureCoordinates.x?The shader produces a
fadevalue by interpolating theinput.TextureCoordinates.xbetween astartDistanceandendDistance. Recall from the theory section that the texture coordinates are used to decide which vertex is which. The.xvalue of the texture coordinates is1when the vertex is theDorFvertex, and0otherwise. TheDandFvertices are the ones that get projected far into the distance. Thus, the.xvalue is a good approximation of the "distance" of any given fragment.Now when you run the game, you can play around with the shader parameters to create a falloff gradient for the shadow.
Tip
If the
shadowHullEffectdebug window is not showing, then you forgot to re-enable theDebugVisiblesetting for the material.Figure 9-31: Controlling shadow length It is worth calling out that this dithering technique only works well because the box blur is covering the pixelated output. Try disabling the blur entirely, and pay attention to the shadow falloff gradient.
You will need to pick values that you like for the shadow falloff. I like
.013for the start and.13for the end and set them in theUpdatemethod of theCoreclass beforeShadowHullMaterial.Update();:ShadowHullMaterial.SetParameter("ShadowFadeStartDistance", .013f); ShadowHullMaterial.SetParameter("ShadowFadeEndDistance", .13f);Note
These gradient numbers are relative to the screen size. If you want to think in terms of pixels, divide the values by the screen size to normalize them:
float endDistance = ShadowFadeEndDistance / maxDistance;
float startDistance = ShadowFadeStartDistance / maxDistance;
Keep in mind that the debug UI only sets shader parameters from
0to1, so you will need to set these values from code.Note
There are other dithering techniques, too!
Using a bayer matrix is perhaps the most "standard" way to perform dithering, but it may not be the best suited to the design challenge at hand. Check out this article that details several different algorithms, and this article from frost kiwi about using dithering to escape color banding.
Shadow Intensity
The shadows are mostly solid, except for the blurring effect. However, that can create a very stark atmosphere. It would be nice if we could simply "lighten" all of the shadows. This is a fairly easy extension from the previous shadow length technique. We could set a max value that the shadow is allowed to be before it is forcibly dithered.
Modify the
shadowHullEffect.fxto introduce a new shader parameter,ShadowIntensity, and use it to force dithering on top of the existing fade-out.float ShadowFadeStartDistance; float ShadowFadeEndDistance; float ShadowIntensity; float4 MainPS(VertexShaderOutput input) : COLOR { // get an ordered dither value int2 pixel = int2(input.TextureCoordinates * ScreenSize); int idx = (pixel.x % 4) + (pixel.y % 4) * 4; float ditherValue = bayer4x4[idx]; // produce the fade-out gradient float maxDistance = ScreenSize.x + ScreenSize.y; float endDistance = ShadowFadeEndDistance; float startDistance = ShadowFadeStartDistance; float fade = saturate((input.TextureCoordinates.x - endDistance) / (startDistance - endDistance)); fade = min(fade, ShadowIntensity); if (ditherValue > fade){ clip(-1); } clip(input.Color.a); return float4(0,0,0,1); // return black }Now you can experiment with different intensity values and fade out the entire shadow.
Figure 9-32: Controlling shadow intensity Pick a value that looks good to you, but I like
.85and enter it in theCoreclassUpdatemethod.ShadowHullMaterial.SetParameter("ShadowIntensity", .85f);
No Self Shadows
The shadows are looking much better! For the final visual adjustment, it will look better if the snake does not cast shadows onto itself. When the snake is long, and the player curves around, sometimes the shadow from some slime segments will cast onto other slime segments. It produces a lot of visual flickering in the scene that can be distracting. It would be best if the snake did not receive any shadows what-so-ever. To do that, we will need to extend the stencil buffer logic.
If you recall from the stencil section that the stencil buffer clears every pixel to 0 for each light, and then shadow caster's shadow hull geometry increases the value. Later, when the lights are drawn, pixels only pass the stencil function when the pixel value is 0. Importantly, the shadow hulls always increased the stencil buffer value per pixel.
In this section, we are going to write the snake segments to the stencil buffer, and then change the shadow hull pass to only draw shadow hulls when the stencil buffer is not a snake pixel.
In this new edition, the values of the stencil buffer are outlined below,
| Stencil Value | Description |
|---|---|
0 |
The snake is occupying this pixel |
1 |
An empty pixel |
2 (or greater) |
A pixel "in shadow" |
Follow the steps to modify the code so that the snake appears stenciled out of the shadows.
First in the
DeferredRendererclass, change the stencil buffer.Clear()call to clear the stencil buffer to1instead of0inside theDrawLightsmethod:public void DrawLights(List<PointLight> lights, List<ShadowCaster> shadowCasters) { Core.GraphicsDevice.SetRenderTarget(LightBuffer); Core.GraphicsDevice.Clear(Color.Black); foreach (var light in lights) { var diameter = light.Radius * 2; var rect = new Rectangle( (int)(light.Position.X - light.Radius), (int)(light.Position.Y - light.Radius), diameter, diameter); // initialize the stencil to '1'. Core.GraphicsDevice.Clear(ClearOptions.Stencil, Color.Black, 0, 1); // ... } // ... }Then, add a new
DepthStencilStateproperty to theDeferredRendererclass:/// <summary> /// The state that will be ignored from shadows /// </summary> private DepthStencilState _stencilShadowExclude;Next, we need to initialize the
_stencilShadowExcludestate in the constructor:_stencilShadowExclude = new DepthStencilState { // instruct MonoGame to use the stencil buffer StencilEnable = true, // in the setup, always set the pixel to '0' StencilFunction = CompareFunction.Always, // Write a '0' anywhere we don't want a shadow to appear ReferenceStencil = 0, // Overwrite the current value StencilPass = StencilOperation.Replace, // ignore depth from the stencil buffer write/reads DepthBufferEnable = false };Then update the existing states to take the new value into account:
_stencilWrite = new DepthStencilState
{
    // instruct MonoGame to use the stencil buffer
    StencilEnable = true,

    // instruct every fragment to interact with the stencil buffer
    StencilFunction = CompareFunction.LessEqual,

    // every operation will increase the shadow value (up to the max of 255), but only when the original
    //  stencil value was greater or equal to '1'. ('1' is the default clear value)
    StencilPass = StencilOperation.IncrementSaturation,

    // this is the value that will be written into the stencil buffer
    ReferenceStencil = 1,

    // ignore depth from the stencil buffer write/reads
    DepthBufferEnable = false
};

_stencilTest = new DepthStencilState
{
    // instruct MonoGame to use the stencil buffer
    StencilEnable = true,

    // instruct only fragments that have a current value greater or equal to the
    //  ReferenceStencil value to interact
    StencilFunction = CompareFunction.GreaterEqual,

    // '1' and `0` are the "non shadow" values
    ReferenceStencil = 1,

    // don't change the value of the stencil buffer. KEEP the current value.
    StencilPass = StencilOperation.Keep,

    // ignore depth from the stencil buffer write/reads
    DepthBufferEnable = false
};
The snake actually needs to be drawn at the right location, at the right time. The quickest way to accomplish this is to introduce a callback in the
DrawLights()method and allow the caller to inject an additional draw call.Modify the
DrawLights()function like so:public void DrawLights(List<PointLight> lights, List<ShadowCaster> shadowCasters, Action<BlendState, DepthStencilState> prepareStencil) { Core.GraphicsDevice.SetRenderTarget(LightBuffer); Core.GraphicsDevice.Clear(Color.Black); foreach (var light in lights) { var diameter = light.Radius * 2; var rect = new Rectangle( (int)(light.Position.X - light.Radius), (int)(light.Position.Y - light.Radius), diameter, diameter); // initialize the stencil to '1'. Core.GraphicsDevice.Clear(ClearOptions.Stencil, Color.Black, 0, 1); // Anything that draws in this setup will set the stencil back to '0'. This '0' acts as a "don't draw a shadow here". prepareStencil?.Invoke(_shadowBlendState, _stencilShadowExclude); // ... } // ... }Adding the necessary
usingfor theActiondefinition:using System;Then, the
GameScene'sDraw()method should be updated to re-draw the snake segments in this callback:// start rendering the lights _deferredRenderer.DrawLights(_lights, casters, (blend, stencil) => { Core.SpriteBatch.Begin( effect: _gameMaterial.Effect, depthStencilState: stencil, blendState: blend); _slime.Draw(_ => {}); Core.SpriteBatch.End(); });Finally, there is a quick change to the
gameEffect.fxin the DungeonSlime project's Content/effects folder. The stencil buffer will be set to0anywhere the slime textures are drawn, even if the pixel in the slime's sprite happens to be completely transparent. That creates an artifact where the whole slime's texture rectangle is excluded from receiving shadows, instead of just the slime art. To fix that, we canclipthe pixels in thegameEffect.fxfile that have an empty alpha value.Add this line to the
gameEffect.fxshader to avoid writing the pixels to the stencil buffer:PixelShaderOutput MainPS(VertexShaderOutput input) { PixelShaderOutput output; output.color = ColorSwapPS(input); // do not even render the pixel if the alpha is blank. clip(output.color.a - 1); // read the normal data from the NormalMap float4 normal = tex2D(NormalMapSampler,input.TextureCoordinates); output.normal = normal; return output; }
Now even when the snake character is heading directly into a light, the segments in the back do not receive any shadows.
| Figure 9-33: No self shadows |
Conclusion
And with that, our lighting and shadow system is complete! In this chapter, you accomplished the following:
- Learned the theory behind generating 2D shadow geometry from a light and a line segment.
- Wrote a vertex shader to generate a "shadow hull" quad on the fly.
- Implemented a shadow system using a memory-intensive texture-based approach.
- Refactored the system to use the Stencil Buffer for masking.
- Developed several techniques for improving the look and feel of the stencil shadows.
In the final chapter, we will wrap up the series and discuss some other exciting graphics programming topics you could explore from here.
You can find the complete code sample for this tutorial series - here.
Continue to the next chapter, Chapter 10: Next Steps