How to create a Custom Vertex Declaration
Demonstrates how to create a custom vertex declaration and use it to render a 3D object.
Overview
MonoGame includes a few predefined classes for common vertex buffer declarations such as VertexPositionColor and VertexPositionColorTexture. If you need to create a vertex buffer declaration that includes additional user-defined types, create a custom vertex declaration.
A custom vertex declaration is a class that implements fully customizable per-vertex data. Furthermore, if you derive the class from IVertexType, you will not need to create a vertex declaration when creating your vertex buffer or drawing the geometry.
Requirements
The following texture will be used to render to the screen.
![]()
Save it to your content project and name it "logo" (this name will used to reference it in the project). Make sure to add it to your content project.
Starting from the Basic Effect tutorial
Follow the steps of How to create a Basic Effect.
This gives us a starting project that is rendering a 3D scene with a Basic Effect.
Create a custom vertex declaration
Create a new class file called
CustomVertex1.csAdd the required
usingstatements to the top of the file.using Microsoft.Xna.Framework; using Microsoft.Xna.Framework.Graphics;Declare a structure that derives from IVertexType.
public struct CustomVertex1 : IVertexTypeAdd members to the struct that describe the per-vertex data.
This example uses position as a Vector3 Structure type, a texture coordinate using a Vector2 Structure type, and a vertex declaration using the VertexDeclaration type.
private Vector3 vertexPosition;
private Vector2 vertexTextureCoordinate;

public readonly static VertexDeclaration VertexDeclaration = new VertexDeclaration
(
    new VertexElement(0, VertexElementFormat.Vector3, VertexElementUsage.Position, 0),
    new VertexElement(12, VertexElementFormat.Vector2, VertexElementUsage.TextureCoordinate, 0)
);
Implement the constructor and public accessor methods.
//The constructor for the custom vertex. This allows similar
//initialization of custom vertex arrays as compared to arrays of a
//standard vertex type, such as VertexPositionColor.
public CustomVertex1(Vector3 pos, Vector2 textureCoordinate)
{
    vertexPosition = pos;
    vertexTextureCoordinate = textureCoordinate;
}

//Public methods for accessing the components of the custom vertex.
public Vector3 Position
{
    get { return vertexPosition; }
    set { vertexPosition = value; }
}

public Vector2 TextureCoordinate
{
    get { return vertexTextureCoordinate; }
    set { vertexTextureCoordinate = value; }
}
Implement a non-public method for accessing the vertex declaration.
VertexDeclaration IVertexType.VertexDeclaration
{
    get { return VertexDeclaration; }
}
Using the Custom Vertex Buffer
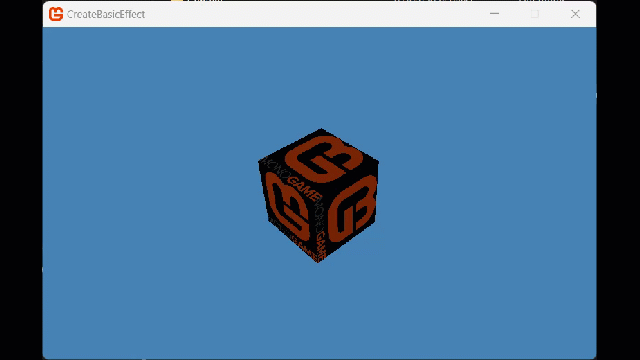
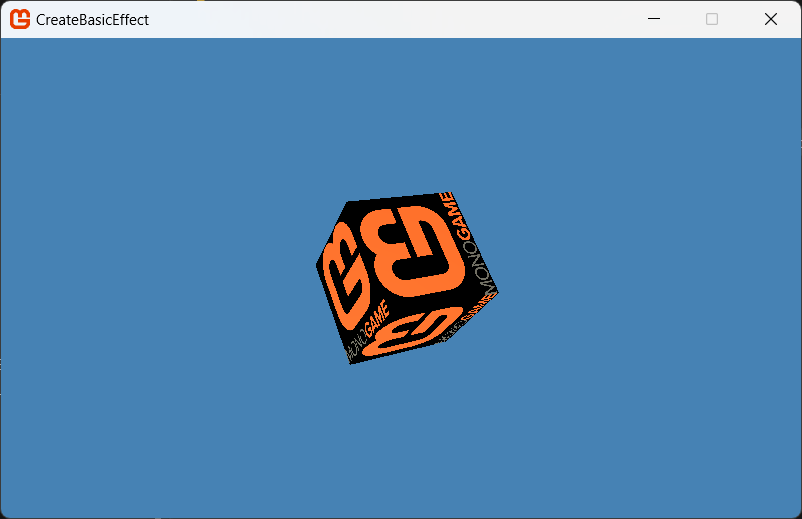
Using the Custom Vertex buffer, we will render a cube that is textured with the logo texture.
Declare some variables at the top of your Game class.
private CustomVertex1[] cubeVertices;
private VertexBuffer vertexBuffer;
private Texture2D logoTexture;
This gives us the necessary data in order to draw our cube.
Create a new method called
SetupDrawingCube()and we will start with initializing the vertex buffer, passing in the typeof(CustomVertex1) instead of a vertex declaration to describe the vertex buffer data.public void SetupDrawingCube() { vertexBuffer = new VertexBuffer( GraphicsDevice, typeof(CustomVertex1), 36, BufferUsage.None );Create the per-vertex data; this shows a portion of the code.
Vector3 LeftTopFront = new Vector3(-1.0f, 1.0f, 1.0f);
Vector3 LeftBottomFront = new Vector3(-1.0f, -1.0f, 1.0f);
Vector3 LeftTopBack = new Vector3(-1.0f, 1.0f, -1.0f);
Vector3 LeftBottomBack = new Vector3(-1.0f, -1.0f, -1.0f);

Vector3 RightTopFront = new Vector3(1.0f, 1.0f, 1.0f);
Vector3 RightBottomFront = new Vector3(1.0f, -1.0f, 1.0f);
Vector3 RightTopBack = new Vector3(1.0f, 1.0f, -1.0f);
Vector3 RightBottomBack = new Vector3(1.0f, -1.0f, -1.0f);

Vector2 textureLeftTop = new Vector2(0.0f, 0.0f);
Vector2 textureLeftBottom = new Vector2(0.0f, 1.0f);
Vector2 textureRightTop = new Vector2(1.0f, 0.0f);
Vector2 textureRightBottom = new Vector2(1.0f, 1.0f);

// Front face.
cubeVertices = new CustomVertex1[36];
cubeVertices[0] = new CustomVertex1(LeftTopFront, textureLeftTop);
cubeVertices[1] = new CustomVertex1(LeftBottomFront, textureLeftBottom);
cubeVertices[2] = new CustomVertex1(RightTopFront, textureRightTop);
cubeVertices[3] = new CustomVertex1(LeftBottomFront, textureLeftBottom);
cubeVertices[4] = new CustomVertex1(RightBottomFront, textureRightBottom);
cubeVertices[5] = new CustomVertex1(RightTopFront, textureRightTop);

// Add the vertices for the BACK face.
cubeVertices[6] = new CustomVertex1(LeftTopBack, textureRightTop);
cubeVertices[7] = new CustomVertex1(RightTopBack, textureLeftTop);
cubeVertices[8] = new CustomVertex1(LeftBottomBack, textureRightBottom);
cubeVertices[9] = new CustomVertex1(LeftBottomBack, textureRightBottom);
cubeVertices[10] = new CustomVertex1(RightTopBack, textureLeftTop);
cubeVertices[11] = new CustomVertex1(RightBottomBack, textureLeftBottom);

// Add the vertices for the TOP face.
cubeVertices[12] = new CustomVertex1(LeftTopFront, textureLeftBottom);
cubeVertices[13] = new CustomVertex1(RightTopBack, textureRightTop);
cubeVertices[14] = new CustomVertex1(LeftTopBack, textureLeftTop);
cubeVertices[15] = new CustomVertex1(LeftTopFront, textureLeftBottom);
cubeVertices[16] = new CustomVertex1(RightTopFront, textureRightBottom);
cubeVertices[17] = new CustomVertex1(RightTopBack, textureRightTop);

// Add the vertices for the BOTTOM face.
cubeVertices[18] = new CustomVertex1(LeftBottomFront, textureLeftTop);
cubeVertices[19] = new CustomVertex1(LeftBottomBack, textureLeftBottom);
cubeVertices[20] = new CustomVertex1(RightBottomBack, textureRightBottom);
cubeVertices[21] = new CustomVertex1(LeftBottomFront, textureLeftTop);
cubeVertices[22] = new CustomVertex1(RightBottomBack, textureRightBottom);
cubeVertices[23] = new CustomVertex1(RightBottomFront, textureRightTop);

// Add the vertices for the LEFT face.
cubeVertices[24] = new CustomVertex1(LeftTopFront, textureRightTop);
cubeVertices[25] = new CustomVertex1(LeftBottomBack, textureLeftBottom);
cubeVertices[26] = new CustomVertex1(LeftBottomFront, textureRightBottom);
cubeVertices[27] = new CustomVertex1(LeftTopBack, textureLeftTop);
cubeVertices[28] = new CustomVertex1(LeftBottomBack, textureLeftBottom);
cubeVertices[29] = new CustomVertex1(LeftTopFront, textureRightTop);

// Add the vertices for the RIGHT face.
cubeVertices[30] = new CustomVertex1(RightTopFront, textureLeftTop);
cubeVertices[31] = new CustomVertex1(RightBottomFront, textureLeftBottom);
cubeVertices[32] = new CustomVertex1(RightBottomBack, textureRightBottom);
cubeVertices[33] = new CustomVertex1(RightTopBack, textureRightTop);
cubeVertices[34] = new CustomVertex1(RightTopFront, textureLeftTop);
cubeVertices[35] = new CustomVertex1(RightBottomBack, textureRightBottom);
For a triangle list, you need three vertices for a triangle and two triangles to make the front face of a cube.
Finally, set the data into the vertex buffer data by calling VertexBuffer.SetData and set the vertex buffer to the device by calling GraphicsDevice.SetVertexBuffer.
vertexBuffer.SetData<CustomVertex1>(cubeVertices);

graphics.GraphicsDevice.SetVertexBuffer(vertexBuffer);
}
In
LoadContentwe need to Load the texture we are going to draw, as well as call the new method we defined to setup the primitive Cube.logoTexture = Content.Load<Texture2D>("logo"); SetupDrawingCube();At the moment the
BasicEffectsetup from the previous tutorial only draws Vertex Colors, so we need to change that to pass it the texture we just loaded, as well as enabling Texture drawingReplace:
basicEffect.VertexColorEnabled = true;With the following
// Enable Texture Drawing - VERY IMPORTANT!!
basicEffect.TextureEnabled = true;

// Set the texture we loaded (does nothing without the above setting)
basicEffect.Texture = logoTexture;
Finally, Draw the object by calling GraphicsDevice.DrawPrimitives.
foreach (EffectPass pass in basicEffect.CurrentTechnique.Passes)
{
    pass.Apply();

    graphics.GraphicsDevice.DrawPrimitives(
        PrimitiveType.TriangleList,
        0,  // start vertex
        12  // number of primitives to draw, 2 vertexes per side of the cube
    );
}
Extra credit, make it spin
At the moment all you can see is the front face of the cube, which is not very exciting. Though Matrix Transforms however, we make our cube spin.
First define a variable to manage the current rotation.
float rotation = 0f;Next, we will update this rotation each frame in the
Updatemethod.// Update rotation angle float deltaTime = (float)gameTime.ElapsedGameTime.TotalSeconds; rotation += deltaTime;Then finally, in the
Drawmethod, we need to calculate the rotation matrix and the translation matrix to rotate the cube by and then apply that to the basic effect drawing the cube.Add the following to the
Drawcall BEFORE the effect drawing loop.// Create rotation matrices Matrix rotationMatrix = Matrix.CreateRotationX(rotation) * Matrix.CreateRotationY(rotation) * Matrix.CreateRotationZ(rotation); // Apply rotation to the world matrix Matrix worldMatrix = rotationMatrix * Matrix.CreateTranslation(new Vector3(0, 0, 0)); // Update the world matrix in the effect basicEffect.World = worldMatrix;
Note
This is a very basic example of applying rotation, just for reference.
With the changes in place, your cube will look a little more snazzy and rotate in the world.