How to create a Basic Effect
Demonstrates how to create and initialize an instance of the BasicEffect class and use it to draw simple geometry.
Overview
The steps described here apply to effects created with the BasicEffect class using the Effect class to write a custom effect.
Note
The example draws aliased geometry, to see an example that draws smoother edges because it also applies anti-aliasing, see Enabling Anti-aliasing (Multi-sampling).
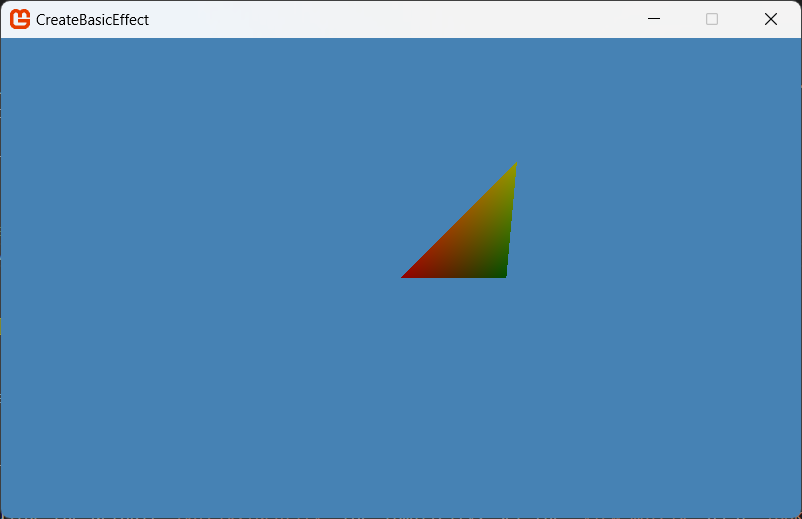
End result
To use BasicEffect
Using the basic effect class requires a set of world, view, and projection matrices, a vertex buffer, a vertex declaration, and an instance of the BasicEffect class.
Declare these properties at the beginning of the game class.
//Matrices for 3D perspective
private Matrix worldMatrix, viewMatrix, projectionMatrix;

// Vertex data for rendering
private VertexPositionColor[] triangleVertices;

// A Vertex format structure that contains position, normal data, and one set of texture coordinates
private BasicEffect basicEffect;
Initialize the world, view, and projection matrices in the
Initialize.Next, create a world matrix using the default
Matrix.Identityfor simplicity. Set theview matrixas alook-atmatrix with a camera position of(0, 0, 50), pointing at the origin. Theprojection matrixis aperspectiveprojection matrix based on a a45-degreefield of view, an aspect ratio equal to the client window, and a set ofnearandfarplanes to render the geometry within in view of the camera.protected override void Initialize() { // Setup the matrices to look forward worldMatrix = Matrix.Identity; viewMatrix = Matrix.CreateLookAt(new Vector3(0, 0, 50), Vector3.Zero, Vector3.Up); projectionMatrix = Matrix.CreatePerspectiveFieldOfView( MathHelper.PiOver4, GraphicsDevice.Viewport.AspectRatio, 1.0f, 300.0f); base.Initialize(); }Initialize a BasicEffect with the transformation and light values in the
LoadContentmethod.protected override void LoadContent() { basicEffect = new BasicEffect(_graphics.GraphicsDevice); basicEffect.World = worldMatrix; basicEffect.View = viewMatrix; basicEffect.Projection = projectionMatrix; // primitive color basicEffect.AmbientLightColor = new Vector3(0.1f, 0.1f, 0.1f); basicEffect.DiffuseColor = new Vector3(1.0f, 1.0f, 1.0f); basicEffect.SpecularColor = new Vector3(0.25f, 0.25f, 0.25f); basicEffect.SpecularPower = 5.0f; basicEffect.Alpha = 1.0f; // The following MUST be enabled if you want to color your vertices basicEffect.VertexColorEnabled = true; // Use the built in 3 lighting mode provided with BasicEffect basicEffect.EnableDefaultLighting(); }Note
If you wish, you can set up the lighting manually through code, as follows:
basicEffect.LightingEnabled = true;
if (basicEffect.LightingEnabled)
{
    basicEffect.DirectionalLight0.Enabled = true; // enable each light individually
    if (basicEffect.DirectionalLight0.Enabled)
    {
        // x direction
        basicEffect.DirectionalLight0.DiffuseColor = new Vector3(1, 0, 0); // range is 0 to 1
        basicEffect.DirectionalLight0.Direction = Vector3.Normalize(new Vector3(-1, 0, 0));
        // points from the light to the origin of the scene
        basicEffect.DirectionalLight0.SpecularColor = Vector3.One;
    }

    basicEffect.DirectionalLight1.Enabled = true;
    if (basicEffect.DirectionalLight1.Enabled)
    {
        // y direction
        basicEffect.DirectionalLight1.DiffuseColor = new Vector3(0, 0.75f, 0);
        basicEffect.DirectionalLight1.Direction = Vector3.Normalize(new Vector3(0, -1, 0));
        basicEffect.DirectionalLight1.SpecularColor = Vector3.One;
    }

    basicEffect.DirectionalLight2.Enabled = true;
    if (basicEffect.DirectionalLight2.Enabled)
    {
        // z direction
        basicEffect.DirectionalLight2.DiffuseColor = new Vector3(0, 0, 0.5f);
        basicEffect.DirectionalLight2.Direction = Vector3.Normalize(new Vector3(0, 0, -1));
        basicEffect.DirectionalLight2.SpecularColor = Vector3.One;
    }
}
Still in
LoadContent, create the per vertex data using theVertexPositionColorformat. This example shows the data for the face of a triangle.triangleVertices = new VertexPositionColor[3]; triangleVertices[0].Position = new Vector3(0f, 0f, 0f); triangleVertices[0].Color = Color.Red; triangleVertices[1].Position = new Vector3(10f, 10f, 0f); triangleVertices[1].Color = Color.Yellow; triangleVertices[2].Position = new Vector3(10f, 0f, -5f); triangleVertices[2].Color = Color.Green;Finally, in the
DrawMethod, call GraphicsDevice.Clear to clear the render target.Set the rasterizer state to turn off culling using the RasterizerState property.
Call EffectPass.Apply to set the effect state in preparation for rendering.
Draw the geometry by calling GraphicsDevice.DrawUserPrimitives.
protected override void Draw(GameTime gameTime)
{
    GraphicsDevice.Clear(Color.SteelBlue);

    RasterizerState rasterizerState1 = new RasterizerState();
    rasterizerState1.CullMode = CullMode.None;
    GraphicsDevice.RasterizerState = rasterizerState1;
    foreach (EffectPass pass in basicEffect.CurrentTechnique.Passes)
    {
        pass.Apply();

        GraphicsDevice.DrawUserPrimitives(
            PrimitiveType.TriangleList,
            triangleVertices,
            0,
            1,
            VertexPositionColor.VertexDeclaration
        );
    }

    base.Draw(gameTime);
}
When the sample is run, the basic geometry is rendered using the custom BasicEffect, feel free to play with the position, content or rendering order to enhance the effect.