How to Extend the Font Description Processor to Support Additional Characters?
Describes the process of developing a custom content processor needed to add additional characters to a FontDescription object based on the text that is required by the game.
In a font description (.spritefont) file, the <CharacterRegions> area can be used to add additional characters to a font description. This enables you to use a SpriteFont to render an additional range of characters.
Important
For the MGCB system (MGCB Editor), all custom pipeline extension libraries MUST target .NET 8 or lower, this is due to the Editor and Command-line project only supporting .NET 8 currently. If you get errors with an Extension at build time, the .NET version of the library is the most likely cause.
This will be resolved with the introduction of the new Content Builder Project solution, which removes such limitations.
For some languages, this approach is not ideal. For example, Chinese and Japanese both have many thousands of characters. Adding the full range of characters to <CharacterRegions> dramatically increases the size of the font asset and the time required to build the font asset. A better solution adds individual characters whenever the specific characters are needed. You can create a custom content processor to implement this solution.
In this example, a file called messages.txt contains all the text rendered by the game. The custom processor adds all the characters contained in the text in this file to a FontDescription. Then it processes the object in the standard way using the base FontDescriptionProcessor functionality. All the characters in messages.txt will then be available to the SpriteFont object at run time.
Important
This tutorial assumes you are using Visual Studio as your IDE, for VSCode please adapt the IDE interactions appropriately.
Using the Font Description Processor
create a new MonoGame project called
FontGameusing the MonoGame template of your choice (for simplicity choose a desktop template)Add a new
SpriteFontcalledDefaultFontto a game project by opening the MGCB Editor, then right-click theContentnode, click Add, and then click New Item.Add the new SpriteFont to the game by selecting the SpriteFont Description (.spritefont) template, name the font
DefaultFontand then click Add.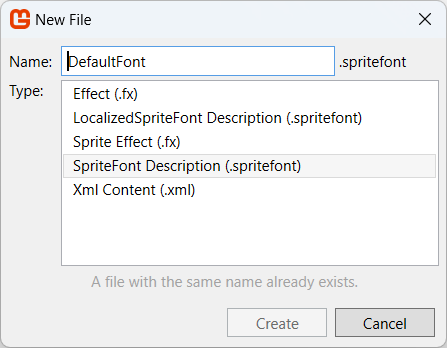
Modify this file to use an existing font and any additional characteristics you prefer.
For more information, see Sprite Font XML Schema Reference.
Add a new text file named
messages.txtto the game project by right-clicking on the FontGame project node in Solution Explorer, click Add, and then click New Item.Select the Text File template, enter messages.txt for the file name, and then click Add to add the text file to the game.
In the new text file, enter any messages that will be printed by the font described in the Sprite Font file.
We will use the method File.ReadAllText to read the text in this file. This method requires a carriage return ("\r") or line feed ("\n") after the last string, so be sure to follow the last line of text in the file with a carriage return or line feed.
To create the new content processor project
The Content Pipeline is part of the build process and it is separate from your game code, therefore you need to create a new assembly that contains the code developed in this topic. Creating this new assembly project is the first step in developing a new processor.
To add the new processor project to the game solution, go to Solution Explorer, right-click the Solution node, click Add, and then click New Project.
In the dialog box, select the template MonoGame Content Pipeline Extension (MonoGame Team)), enter
MyFontProcessorin the Name field, and then click OK. The new project automatically contains references to the MonoGame Framework run-time and design-time Content Pipeline assemblies.
To extend the font processor
Open the
Processor1.cswhich is the template Content Processor example.Add the following lines of code, after the last
usingstatement:using System.IO; using System.ComponentModel;Remove the placeholder code that assigns the processor input (
TInput) and output (TOutput) types, including the `Process" method. They will not be needed.Change the base class of
Processor1from ContentProcessor<TInput, TOutput> to FontDescriptionProcessor, which identifies it as a SpriteFont processor.[NOTE] You can read all about the different types of built-in processors in the API docs Content.Pipeline.Processors
Change the class name and the Processor display name to something a little more unique, so that we know which processor we are selecting, from "Processor1" to "MyFontProcessor".
[ContentProcessor(DisplayName = "MyFontProcessor")]
internal class MyFontProcessor : FontDescriptionProcessor
Add a new processor parameter (property) to the the class declaration and adorn it with C# Attributes to state additional processing parameters for the property.
This parameter stores the name of the text file that stores the messages displayed by the game.
[DefaultValue("messages.txt")]
[DisplayName("Message File")]
[Description("The characters in this file will be automatically added to the font.")]
public string MessageFile
{
    get { return messageFile; }
    set { messageFile = value; }
}
private string messageFile = @"../messages.txt";
Note
As the "messages.txt" file is not in our content project, we need to supply a path "relative" to the "Content" project where the Content Processor is running from. Hence the path to the file is denoted as
@"../messages.txt".Add a new Process method override to match the following code:
public override SpriteFontContent Process(FontDescription input, ContentProcessorContext context)
{}
This modification replaces the template parameter and return types with the proper types needed for the extended font processor.
Inside the
Processmethod, register a Content Pipeline dependency onmessages.txt, which will read specifically from a file by that name from the Game Project.This dependency tells the Content Pipeline that if messages.txt changes, the font must be rebuilt.
string fullPath = Path.GetFullPath(MessageFile);

context.AddDependency(fullPath);
Next, we add functionality to read the contents of the file and add each letter to the input font one by one. Note that the Characters collection keeps track of duplicates automatically, it is not necessary for the user to make sure that each letter is added only once. The Characters collection will contain only one instance of each character, no matter how many times Add has been called.
string letters = File.ReadAllText(fullPath, System.Text.Encoding.UTF8);

foreach (char c in letters)
{
    input.Characters.Add(c);
}
Note
In this example, messages.txt has been saved with Unicode UTF-8 encoding, which is the default encoding format that is specified in the call to File.ReadAllText. However, the default file encoding format for text files that have been added to a Visual Studio project is
Western European (Windows) encoding, corresponding to code page1252. If your text file uses a different encoding, specify the character encoding as follows:string letters = File.ReadAllText( fullPath, System.Text.Encoding.GetEncoding( 1252 ) );Finally, call the
BaseProcess method of the FontDescriptionProcessor to build the font with the newly requested characters.return base.Process(input, context);
Done. If your txt file is located elsewhere, make sure to update the path to the file appropriately, FROM the content project folder in the Processor project.
Final code:
using Microsoft.Xna.Framework.Content.Pipeline;
using Microsoft.Xna.Framework.Content.Pipeline.Graphics;
using Microsoft.Xna.Framework.Content.Pipeline.Processors;
using System.ComponentModel;
using System.IO;

namespace FontProcessor
{
    [ContentProcessor(DisplayName = "MyFontProcessor")]
    internal class MyFontProcessor : FontDescriptionProcessor
    {
        public override SpriteFontContent Process(FontDescription input, ContentProcessorContext context)
        {
            string fullPath = Path.GetFullPath(MessageFile);

            context.AddDependency(fullPath);
            string letters = File.ReadAllText(fullPath, System.Text.Encoding.UTF8);

            foreach (char c in letters)
            {
                input.Characters.Add(c);
            }
            return base.Process(input, context);
        }

        [DefaultValue("messages.txt")]
        [DisplayName("Message File")]
        [Description("The characters in this file will be automatically added to the font.")]
        public string MessageFile
        {
            get { return messageFile; }
            set { messageFile = value; }
        }
        private string messageFile = @"../messages.txt";
    }
}
Associate the custom font processor with the sprite font in the MGCB tool
Compile the solution to build MyFontProcessor, as you need to add your custom font processor as an available content processor for the content pipeline.
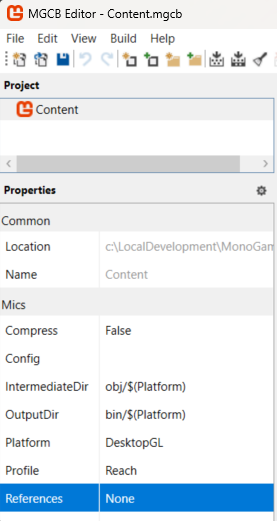
Open the MGCB tool for your
Contentproject, click (select) the Content node, navigate down to the properties section and then click in the References property.Navigate to the
dllfor the builtMyFontProcessorproject (which by default is in\FontGame\MyFontProcessor\bin\debug\net6.0), select it and click "open".[IMPORTANT] Ensure that the processor project is always up to date when the main game is built, you need to create a project dependency. Also use either "debug" or "Release" build types for the processor project, the MGCB tool will NOT dynamically select it when you change the Projects build type.
Build the Content Project to ensure everything is connected as it should be.
Select the
.spritefontfile, and then in the Properties window change theprocessortoMyFontProcessorin the drop-down list associated with the ContentProcessor field.
When you build the solution, the new processor adds the characters in the messages.txt file to the list of characters available to the SpriteFont.
See Also
Extending a Standard Content Processor Adding New Content Types