How to add a custom XML Content File to a Project?
Describes how to add custom game data as an XML file through the Content Pipeline.
Custom game data that is expressed in an XML format can be easily integrated into your game through the MonoGame Content Pipeline.
This example demonstrates the procedure for integrating custom XML data into the content project of a simple game for the Windows platform.
Important
This tutorial assumes you are using Visual Studio as your IDE, for VSCode, follow this guide from Microsoft for creating multi-project solutions from the command-line utilizing the MonoGame Project and MonoGame Class library templates.
To define game data
Within the MonoGame solution, you create a new Windows Game Library project.
Right-click the solution node, point to
Add, clickNew Project, and then select theMonoGame Game Librarytemplate.Tip
A
MonoGame Game Libraryproject is created instead of a Content Pipeline Extension Library project so that the class we will define can be used by both the Content Importer that runs at build-time and the Content Loader at game runtime.Important
For MonoGame
3.8.2and below, make sure to keep the project at.NET 6or below. The MGCB tool for 3.8.2 CANNOT understand or read .NET 8 libraries as it is compiled with .NET 6. The Game project can use a higher version, but library projects must stay at.NET 6else they cannot be read.In the
Namebox, typeMyDataTypes, and then clickOK.In the
Solution Explorer, delete the existingGame1.csas it is not needed.right-clickand selectAdd -> Add New Itemto add a new class, call itPetData.csDouble click on
PetData.csand replace its contents with the following code to define thePetDataclass.namespace MyDataTypes { public class PetData { public string Name; public string Species; public float Weight; public int Age; } }Build the
MyDataTypesproject for debug or release to generate the library's dll file (note which profile you used).
Add an XML file using the custom data to the game content
In this procedure, the MyDataTypes library is added as a reference in the content project.
Build the
MyDataTypesproject, making not of whether it is aDebugorReleasebuild.Note
It is recommended to always use the same built type for building library projects, as they normally only contain "types" it is safe to just build them as
Release. The reason being that you cannot CHANGE the reference once made in the MGCB editor and it is not affected by theBuild Typeused to generate the project.In the
Solution Exploreror your game project,right-clickthe game content folder, point toAdd, and then clickNew Item.In the
Add New Itemdialog box, typepets.xmlas the file name, and then clickOK.Replace the contents of the template file with the following XML code:
<?xml version="1.0" encoding="utf-8" ?>
<XnaContent>
  <Asset Type="MyDataTypes.PetData[]">
    <Item>
      <Name>Fifi</Name>
      <Species>Dog</Species>
      <Weight>11</Weight>
      <Age>6</Age>
    </Item>
    <Item>
      <Name>Bruno</Name>
      <Species>Dog</Species>
      <Weight>21</Weight>
      <Age>12</Age>
    </Item>
    <Item>
      <Name>Chloe</Name>
      <Species>Cat</Species>
      <Weight>6</Weight>
      <Age>3</Age>
    </Item>
    <Item>
      <Name>Pickles</Name>
      <Species>Hamster</Species>
      <Weight>0.4</Weight>
      <Age>1</Age>
    </Item>
  </Asset>
</XnaContent>
Tip
TO learn how to generate the custom MonoGame XML content from your own classes, refer to the How to Generate custom XML guide.
Open the
MGCB Editorfrom theGameproject (not the library) by selecting the.mgcbfile and either Double-clicking it (Visual Studio) or Right-clicking it and selectingOpen(VSCode).Tip
If you have any issues opening the MGCB content project, please refer to the How to load content guide.
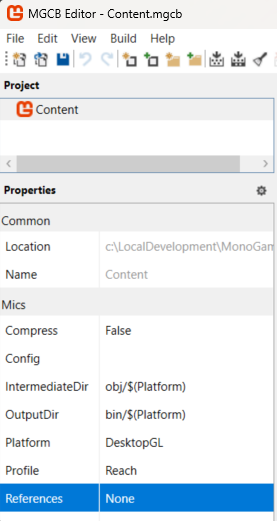
In the
MGCB Editor, select the "Content" node and the top and then locate theReferencessection in thePropertieswindow, as shown below:Click the
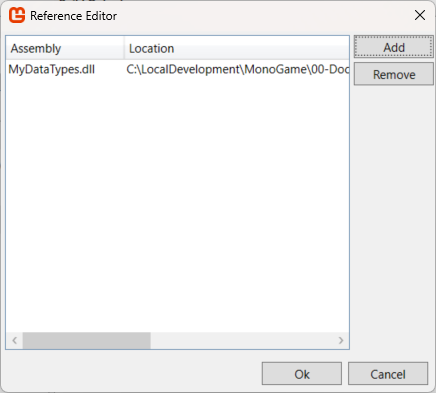
ReferencesVALUE field and a new window should pop up allowing you to manage the references for the MGCB project:In the
Reference Editorwindow, clickAdd, and navigate to theMyDataTypesproject and locate the builtdll, normally underbin/release/net8.0(or DEBUG if you use the debug build). Once selected, clickOpenand the reference should be added to the Reference Editor as shown above.Tip
If the folder is empty, return to visual studio and build the
MyDataTypesproject, if it is not built, there is no dll. And make sure to choose either thedebugorreleasefolder depending on how the class library is built.Click on
Add Existingfrom theEdit -> Addoptions in the menu (or theAdd Existingtoolbar button) and select thepets.xmlfile.
When you press F6 to build the solution, it should build successfully, including the custom game content imported from the XML file.
Important
Adding the the class library of the data types project to the Content project is critical, else the Content Pipeline does not know how to serialize or deserialize the custom data you have defined.
Although it is possible to simply serialize value types or value type arrays without this step.
To load the data at runtime, see the tutorial Loading XML Content at Runtime.