Step 5: Understand the Code
Learn about the folders in a MonoGame Empty Game project, the Game1 class and the game loop.
Before you make the game, it is important to know how a MonoGame project using the new "Empty Game" single project template is organized and how the code operates.
In this step, you will:
- Learn about the folders in the project.
- Learn about the start point of the game.
- Learn about each method in the
Game1class. - Learn about the game loop.
The project folders
The MonoGame Empty Game template creates the following folders and files:
| Folder or file | Contents |
|---|---|
Source/ |
Your game code. All platform projects build the files in this folder. Start with Game1.cs. |
Content/ |
The Content Builder project. Your content files go in Content/Assets. |
Platforms/ |
One project for each platform. Each project contains only the start point and the settings for its platform. |
Resources/ |
The name, icons and other files that identify your game. Resources/Identity.props sets the name and version for all platforms. |
BatAndBall.sln |
The solution file. It contains all the projects. |
Directory.Packages.props |
The MonoGame version for all projects. |
Each platform project shares the code from the Source folder with this line in its .csproj file:
Note
Not covered as part of this tutorial, but if you had a need to have platform-specific (non-shared) code in your project, then simply creating the file inside the Project's folder, the file will then only compile for that project alone, similar to the program.cs in each platform's folder.
<Compile Include="..\..\Source\**\*.cs" />
Thus, you write your game one time, and each platform project builds it.
Tip
To change the MonoGame version for all projects, change the MonoGameVersion value in Directory.Packages.props.
If you need to force the version of MonoGame for any project, simply replace Version="$(MonoGameVersion)" with the version you want that platform to use.
The starting point
Each platform project has a small file that starts the game. For DesktopVK, this file is Platforms/DesktopVK/Program.cs, the WindowsDX12 project has the same file:
using BatAndBall;

using var game = new Game1();
game.Run();
This code makes an instance of your Game1 class. Then, it calls Run to start the game. The using keyword makes sure that MonoGame releases the resources of the game when the game stops.
The Game1 class
The shared Source/Game1.cs contains all the code for your game. In this section, we will explain each part of the file, along with the changes that you made in Step 4.
Open the file in your IDE, so that you can see each part in its place.
The Game1 class inherits from the MonoGame Game class. The Game class gives you the game window, the graphics device and the game loop. You override these methods in your own copy, to add the code for your game.
Tip
Remember, MonoGame is fully open source, and if you ever need to understand what any class, function or code does, you can inspect the Source or the API Documentation to find out.
The fields
private GraphicsDeviceManager _graphics;
private SpriteBatch _spriteBatch;
private Texture2D _batTexture;
- GraphicsDeviceManager configures the graphics device. For example, it sets the size of the game window.
- SpriteBatch draws 2D images and text. It collects the draw calls and sends them to the graphics device together, to make drawing fast.
_batTextureholds the texture that you loaded in Step 4.
The constructor
public Game1()
{
    _graphics = new GraphicsDeviceManager(this);
    Content.RootDirectory = "Content";
    IsMouseVisible = true;
}
The constructor runs one time, when the game starts. It does the following tasks:
- It makes the
GraphicsDeviceManager. - It sets
Content.RootDirectoryto"Content". This is the folder where the Content Builder puts the built.xnbfiles. - It shows the mouse cursor in the game window.
Here you should only add code to prepare your game, but nothing heavy. This code needs to run to start the application and the window will not finish loading until it has finished.
Important
On some platforms, such as consoles, this can impact the acceptance of your project due to minimum startup times. So be careful what you need to initialize, if in doubt, leave it to "LoadContent" or some async function later.
Initialize
protected override void Initialize()
{
    // TODO: Add your initialization logic here

    base.Initialize();
}
MonoGame calls Initialize one time, after the graphics device is ready. Put the code that sets the starting values of your game here, especially if it requires access to the graphics card.
Although be aware, in Initialize, the graphics device has only been created, and is not yet running. If you need the actual screen size is running under for example, then you will need to bind to the GraphicsDeviceManager.DeviceReset or Window.ClientSizeChanged events.
Important
Do not remove the base.Initialize() call. MonoGame calls LoadContent from base.Initialize().
LoadContent
protected override void LoadContent()
{
    _spriteBatch = new SpriteBatch(GraphicsDevice);

    // TODO: use this.Content to load your game content here
    _batTexture = Content.Load<Texture2D>("bat");
}
MonoGame calls LoadContent one time, after Initialize. In this method, you load your textures, sounds and fonts ready for use. This method also initializes the SpriteBatch, because the SpriteBatch needs the graphics device.
Update
    protected override void Update(GameTime gameTime)
    {
#if !__IOS__
        // Exit the game if the Back button (GamePad) or Escape key (Keyboard) is pressed.
        // (iOS does not allow programmatically closing an app.)
        if (GamePad.GetState(PlayerIndex.One).Buttons.Back == ButtonState.Pressed || Keyboard.GetState().IsKeyDown(Keys.Escape))
            Exit();
#endif

        // TODO: Add your update logic here

        base.Update(gameTime);
    }
MonoGame calls Update many times each second. This is where the core of your game logic is located or called from. For example, to read input from devices (e.g. Keyboard), move objects and find collisions.
In the template code, a stop is added to exit the game when the player pushes the Back button on a gamepad or the Esc key on the keyboard. The #if !__IOS__ line removes this code from iOS builds, because iOS does not allow an app to close itself.
Draw
protected override void Draw(GameTime gameTime)
{
    GraphicsDevice.Clear(Color.CornflowerBlue);

    // TODO: Add your drawing code here
    _spriteBatch.Begin();
    _spriteBatch.Draw(_batTexture, new Vector2(100, 100), Color.White);
    _spriteBatch.End();

    base.Draw(gameTime);
}
MonoGame calls Draw after each Update. Put the code that draws your game here.
- GraphicsDevice.Clear fills the screen with one color. Do this at the start of each frame.
- SpriteBatch.Begin starts a group of draw calls.
- SpriteBatch.Draw adds a texture to the group, at a position and with a color tint.
Color.Whiteshows the texture with no tint. - SpriteBatch.End sends the group to the graphics device.
Note
Do not put game logic in Draw. MonoGame can skip calls to Draw if the game runs slowly, but it does not skip calls to Update.
The game loop
After LoadContent, MonoGame starts the game loop. The game loop calls Update, then Draw, again and again until the game stops.
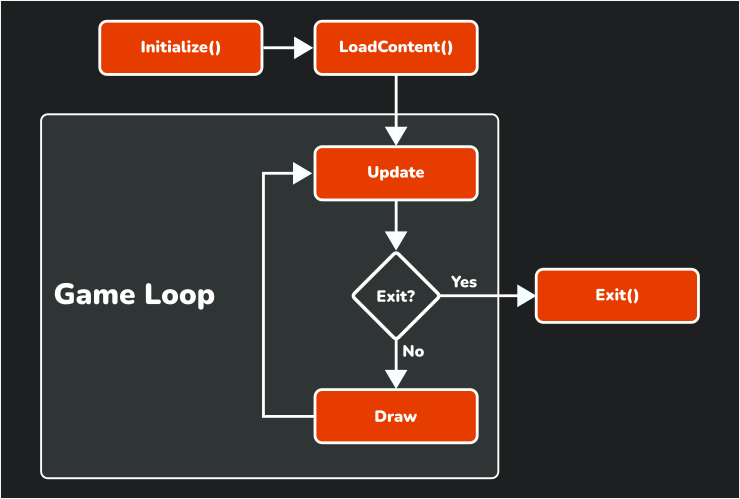 |
|---|
| Figure 5-1: The life cycle of a MonoGame game |
By default, MonoGame calls Update 60 times each second, each call to Update and Draw gets a GameTime value which tells you how much time went by since the last call. Use this value to move objects at the same speed on fast and slow computers.
Note
Desktop applications, such as a web browser, wait for the user to do something. Games are different. In a game, objects move and animations play when the player does nothing. Thus, a game must continuously update and draw.
Conclusion
In this step, you accomplished the following:
- You learned how the project folders are organized.
- You learned how each platform project starts the shared
Game1class. - You learned what each method in
Game1does. - You learned how the game loop calls
UpdateandDraw.
In the next step, you will use this knowledge to make a two player bat and ball game.
Test Your Knowledge
In which folder do you put the game code that all platforms use?
In the
Sourcefolder.In which method do you load textures, sounds and fonts?
In the
LoadContentmethod.What is the sequence of the methods in the game loop?
Update, thenDraw. The game loop calls these two methods again and again until the game stops.Why must you use
GameTimeto move objects?GameTimetells you how much time went by since the last frame. If you multiply the speed by this time, objects move at the same speed on fast and slow computers.