Chapter 05: Content Pipeline
Learn the advantages of using the Content Pipeline to load assets and go through the processes involved in loading your first asset
Every game has assets: images to represent the visual graphics to players, audio to provide sound effects and background music, fonts to render text with, and much more. These assets start out as raw files (e.g. .png image files or .mp3 audio files), which you will need to load into the game to use.
Chapter Video
| Live Recording |
Loading Assets
Loading assets can be done during runtime directly from file, or it can be loaded through the Content Pipeline. Both of these methods are two sides of the same coin, and there are trade offs to each approach.
For instance, to load an image file directly at runtime, you would need to:
- Add the image file to your project.
- Configure the project to copy the image file on build to the build output folder.
- Load the image file as a texture at runtime using the Texture2D.FromFile method.
Important
One major drawback of loading an image file as a texture directly at runtime is that the data is in a compressed format, such as .png or .jpg. These compression formats are not understood by a Graphics Processing Unit (GPU). In order to be used by your game, this data will need to be decompressed into raw bytes, a format that the GPU understands. This operation can potentially leave a larger memory footprint for your assets. You will also need to handle how different compression formats work on the platform you are targeting, such as desktops, mobile and consoles.
On the other side of the coin, MonoGame offers the Content Pipeline; a workflow for managing assets. The workflow is made up of a set of tools and utilities that are automatically added by default when you create a new MonoGame project using the MonoGame project templates. To use this workflow, you need to:
- Add the asset file to your content project (Content.mgcb file) using the MonoGame Content Builder Editor (MGCB Editor).
- Perform a project build. This will cause the MonoGame.Content.Builder.Tasks NuGet reference to compile the assets defined in the content project, optimized for the target platform, and automatically copy them to the game project build folder.
- Load the compiled asset at runtime using the ContentManager.
For the same amount of steps, you also get the benefit of the assets being pre-processed and compiled to an optimized format for the target platform. For instance, image files can be compiled using DXT compression, which is a format that is understood by GPUs without needing to be decompressed first, reducing the memory footprint.
Note
For more information on the benefits of compiling assets and what optimizations it can offer, see the Content Pipeline documentation.
For this tutorial series, we are going to focus on using the content pipeline workflow to load assets. Doing this will allow you, as the developer, to get accustomed to using the content pipeline tools, and also give the benefits of having assets pre-compiled to optimized formats.
The MGCB Editor
As mentioned previously, the content pipeline workflow in MonoGame is made up of a set of tools that come with every new MonoGame project. At the center of this workflow is the MGCB Editor; a graphical tool for managing your game's content.
Opening the MGCB Editor can be done in different ways depending on which IDE and development environment you have. Choose the one you are using below to open the MGCB Editor so we can explore its interface:
To open the Content.mgcb content project file in the MGCB Editor from Visual Studio Code, you can use the MonoGame for VSCode extension. You should already have installed this extension in Chapter 02. With this extension installed, anytime you have a code file open, you will see the MonoGame logo in the top-right of the code window like below:
| Figure 5-1: MonoGame for VSCode extension icon |
Clicking the MonoGame logo here will open the Content.mgcb content project file from the current project in the MGCB Editor.
Tip
If for any reason the MGCB editor fails to load or you are hit with MGCB errors when you build your project, it is likely the MGCB references from the dotnet-tools.json configuration located in your projects .config folder have not been loaded/initialized.
To correct this, simply run the following from a terminal/command prompt in your projects directory (there the .config folder is located)
dotnet tool restore
This should restore the tool with the version that is configured. If at any time you update your dotnet-tools.json configuration, e.g. when upgrading to a newer version of MonoGame, you will need to run this command again
 |
|---|
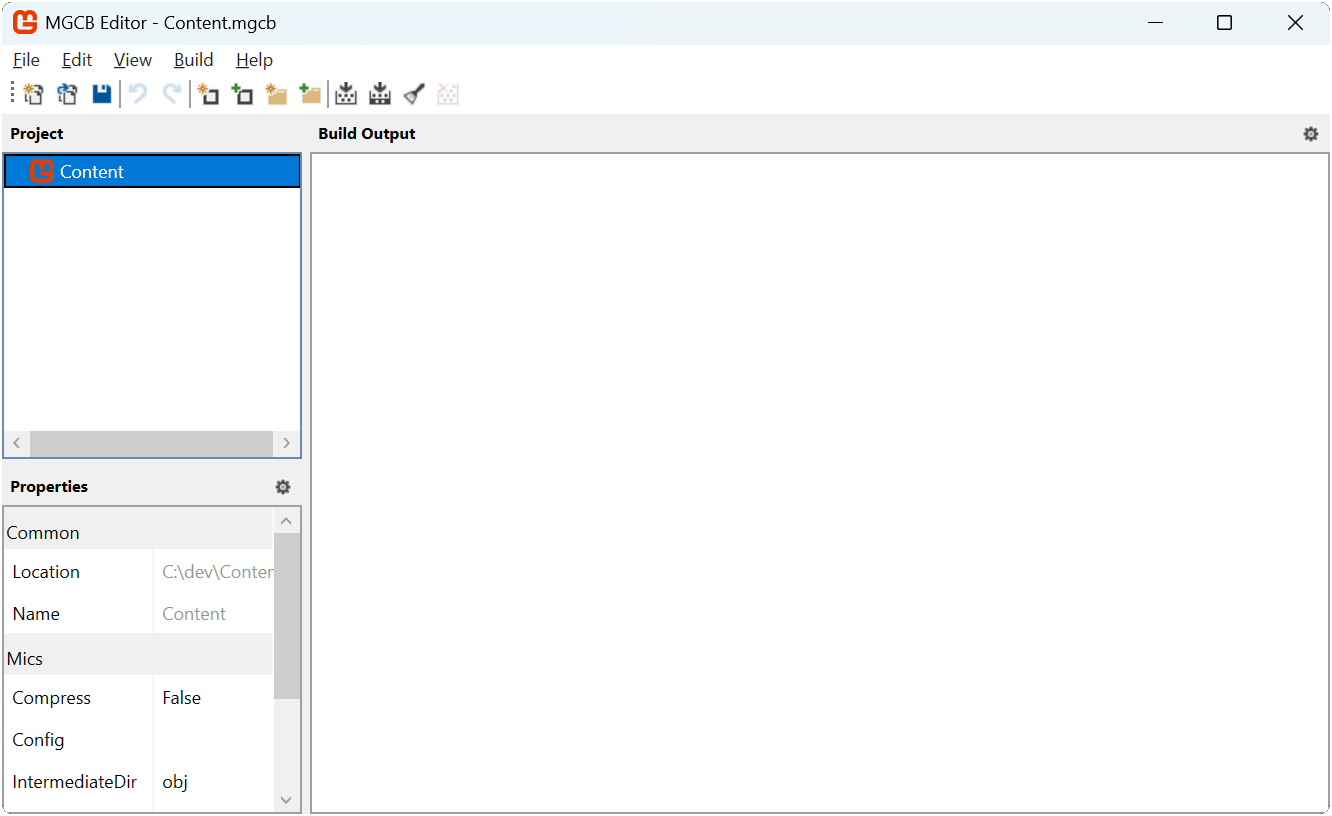
| Figure 5-2: MonoGame Content Builder Editor (MGCB Editor) Window |
In Figure 5-2 above, you can see the user interface for the MGCB Editor:
- Toolbar: Contains icon buttons for common actions such as creating new items, opening files, saving changes, and building content.
- Project Panel: Located on the left side of the MGCB Editor, it displays a hierarchical tree view of all content items added to the content project. The root node Content represents the root of the content project.
- Properties Panel: Located in the lower left corner of the MGCB Editor, it lists the properties of the currently selected item in the project panel. The available properties are based on the selected element type.
- Build Output Panel: The large area to the right side outputs build messages, warnings, and errors when content is processed.
Creating Folders to Organize Content
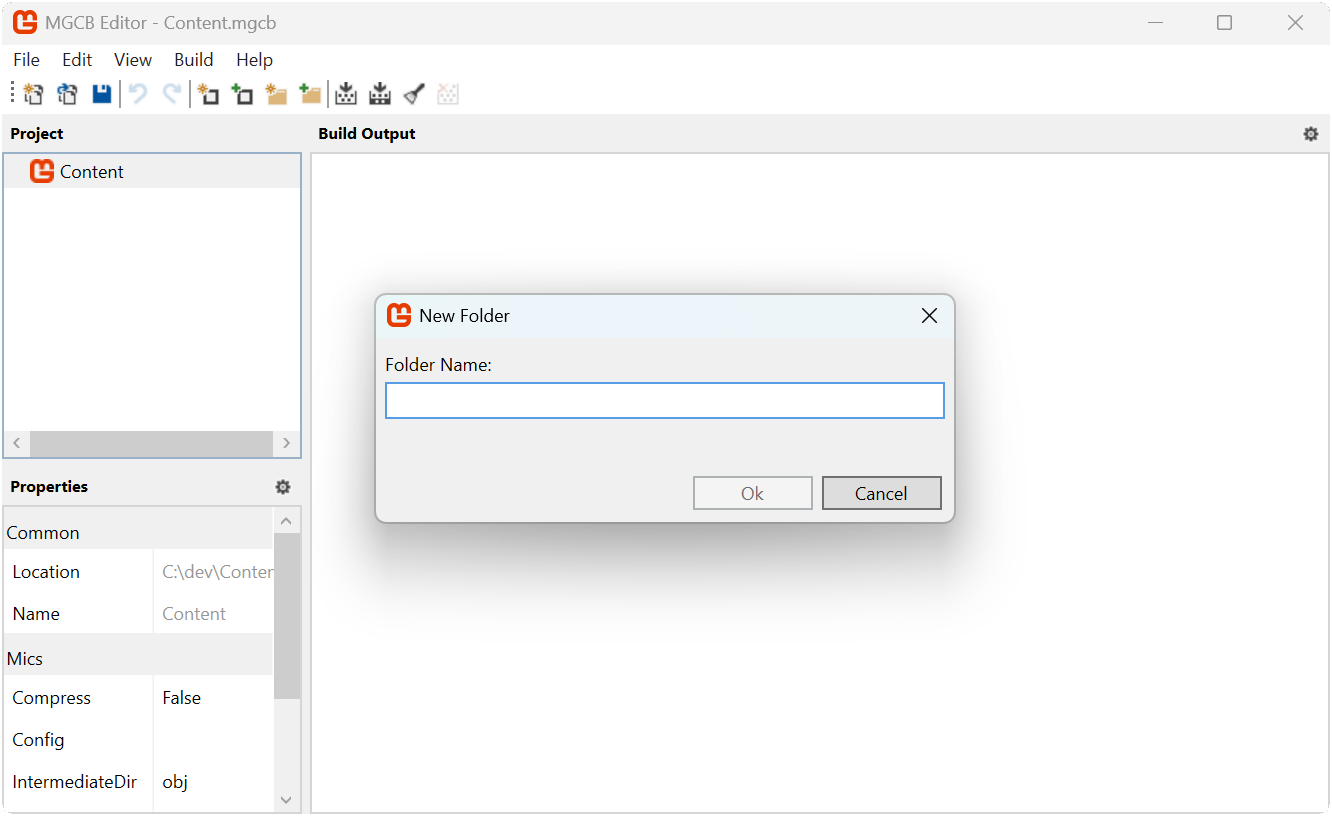
Organizing your game assets into folders helps keep your content project manageable as it grows. For now, we will add a new folder that will hold the image assets we will add to the game throughout this tutorial series. In the MGCB Editor:
- In the Project Panel, select the root
Contentnode. - Right-click it and choose
Add > New Folder...from the context menu. - Type
imagesfor the folder name and click theOkbutton.
 |
|---|
| Figure 5-3: New folder pop-up |
You have now created a folder that will help organize the game's image assets. As we continue through this tutorial series, we will be adding additional folders for organization of content such as audio, fonts, and effects.
Note
If you try to add a new folder that already exists in the file system but is not showing in the MGCB editor, you will get an error. Either remove the folder or use Add Existing Folder instead.
Adding Your First Asset
Now that we have a folder structure, we can add our first image asset to the project. For this example, we will use the MonoGame logo. Perform the following:
First, download the MonoGame logo by right-clicking the following image and saving it as
logo.pngsomewhere on your computer:
Figure 5-4: MonoGame Horizontal Logo In the MGCB Editor, select the
imagesfolder you created earlier.Right-click it and choose
Add > Existing Item...from the context menu.Navigate to the location of the
logo.pngfile you just downloaded and select it.Click the
OpenbuttonWhen prompted in the add existing file popup, choose
Copy the file to the directory.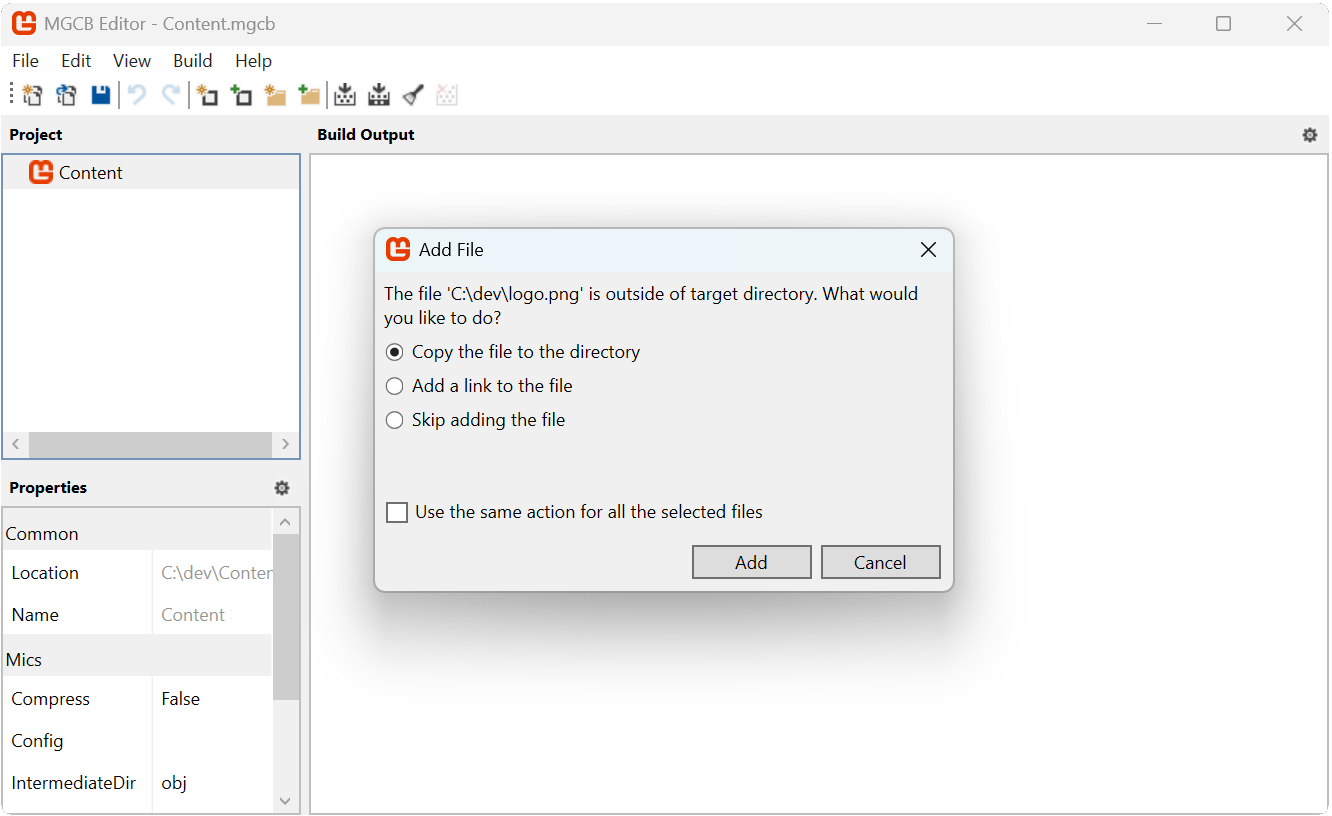
Figure 5-5: Add existing file pop-up Save the changes to the content project by selecting
File > Savefrom the top menu or pressingCTRL+S.
| Figure 5-6: The logo image added to the content project in the MGCB Editor |
Important
After changes have been made in the MGCB Editor, ensure that you save the changes. They are not automatically saved, though you will be warned if you close the editor and have not saved changes. You can tell that changes have not been saved by looking at the title bar of the MGCB editor window. If it has an '*' at the end of the window title, this means changes have not been saved.
Understanding the Content Pipeline Workflow
Now that we have added our first asset, we can take a moment to understand what happens to this asset in the Content Pipeline workflow:
- You create source files for your game assets such as images, audio, fonts, effects, and 3D models.
- Using the MGCB Editor, add these assets to your content project (the
Content.mgcbfile). - When you perform a build of your project, the
MonoGame.Content.Builder.TaskNuGet reference will:- Compile the assets defined in the content project using the MonoGame Content Builder (MGCB) tool into
.xnbfiles. - Copy the compiled
.xnbfiles from the content project's build folder to your game project's build folder.
- Compile the assets defined in the content project using the MonoGame Content Builder (MGCB) tool into
- At runtime, you load the compiled assets using the ContentManager.
The following diagram demonstrates this workflow:
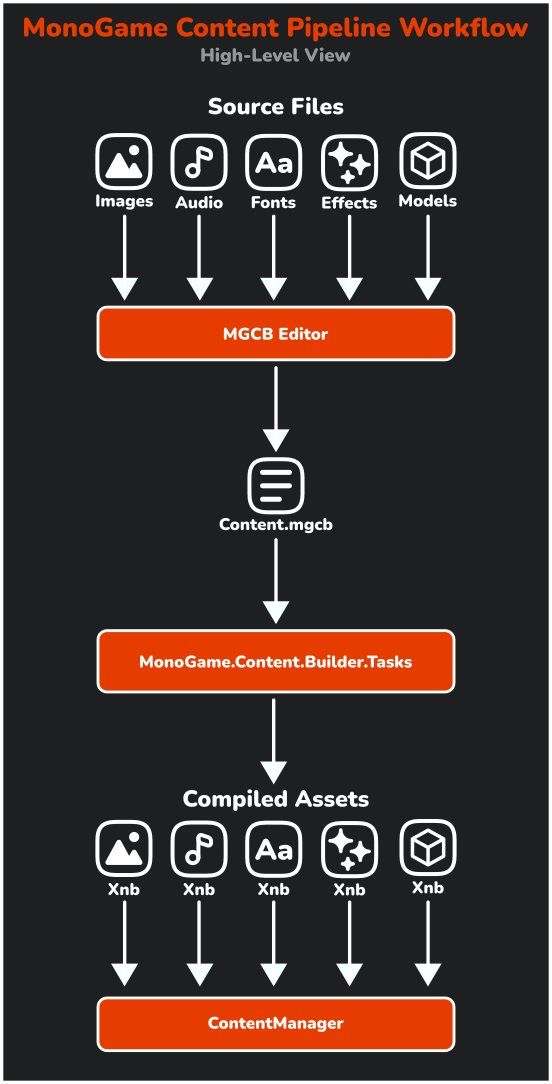 |
|---|
| Figure 5-7: MonoGame Content Pipeline Workflow diagram showing the process flow from source files (Images, Audio, Fonts, Effects, Models) through the MGCB Editor to generate the Content.mgcb file, which is then processed by MonoGame.Content.Builder.Tasks to create compiled .xnb assets (Xnb formats for each type), which are finally loaded by the ContentManager at runtime |
The Content Pipeline offers significant advantages:
- Assets are pre-processed and optimized for your target platform.
- Image files can be compiled using formats like DXT compression, which GPU's understand natively.
- Asset loading is simplified and consistent across platforms.
The ContentManager Class
To load assets in your game code, MonoGame provides the ContentManager class. The Game already has a Content property which is a ready-to-use instance of the ContentManager
ContentManager Methods
The key methods for asset loading are:
| Method | Returns | Description |
|---|---|---|
| Load<T>(string) | T |
Loads the asset of type T that has been processed by the content pipeline. |
| Unload | void |
Unloads all assets that have been loaded by that content manager instance. |
Tip
When an asset is loaded for the first time, the ContentManager internally caches it. Loading the same asset again will return the cached version, avoiding extra disk reads.
Understanding Content Paths
When loading content, you need to specify the path to the asset, minus the extension. This path is relative to the ContentManager's RootDirectory property, which is set to "Content" by default in the Game1 constructor.
For example, with our newly added logo in the "images" folder,the path would be "images/logo" (without the file extension). The reason for this relates to the build process. When you build your project, the MonoGame.Content.Builder.Tasks NuGet reference compiles your assets and copies them to the game's output folder.
This creates a folder structure in your output directory similar to:
DungeonSlime/
    └── bin/
        └── Debug/
            └── net8.0/
                ├── DungeonSlime.exe
                └── Content/
                    └── images/
                        └── logo.xnb
Note
Notice that the compiled asset has an .xnb extension, but when loading the asset in code, you refer to it without any extension.
Loading and Displaying Your First Asset
Now that we have the MonoGame logo added as an asset in the content project, we can modify the game to display the logo. In the DungeonSlime project, open the Game1.cs file and perform the following:
Add a field to store the logo texture by inserting this line after the class declaration:
// The MonoGame logo texture
private Texture2D _logo;
In the LoadContent method, add this line to load the logo texture:
_logo = Content.Load<Texture2D>("images/logo");Finally, in the Draw method, add these lines before the
base.Draw(gameTime);call:// Begin the sprite batch to prepare for rendering. SpriteBatch.Begin(); // Draw the logo texture SpriteBatch.Draw(_logo, Vector2.Zero, Color.White); // Always end the sprite batch when finished. SpriteBatch.End();Note
We will go into more details about the SpriteBatch in the next chapter.
The complete updated Game1.cs file should now look like this:
using Microsoft.Xna.Framework;
using Microsoft.Xna.Framework.Graphics;
using Microsoft.Xna.Framework.Input;
using MonoGameLibrary;
namespace DungeonSlime;
public class Game1 : Core
{
// The MonoGame logo texture
private Texture2D _logo;
public Game1() : base("Dungeon Slime", 1280, 720, false)
{
}
protected override void Initialize()
{
// TODO: Add your initialization logic here
base.Initialize();
}
protected override void LoadContent()
{
_logo = Content.Load<Texture2D>("images/logo");
}
protected override void Update(GameTime gameTime)
{
if (GamePad.GetState(PlayerIndex.One).Buttons.Back == ButtonState.Pressed || Keyboard.GetState().IsKeyDown(Keys.Escape))
Exit();
// TODO: Add your update logic here
base.Update(gameTime);
}
protected override void Draw(GameTime gameTime)
{
GraphicsDevice.Clear(Color.CornflowerBlue);
// Begin the sprite batch to prepare for rendering.
SpriteBatch.Begin();

// Draw the logo texture
SpriteBatch.Draw(_logo, Vector2.Zero, Color.White);

// Always end the sprite batch when finished.
SpriteBatch.End();
base.Draw(gameTime);
}
}
Running the game now will show the MonoGame logo displayed in the upper-left corner of the game window.
| Figure 5-8: The MonoGame logo drawn to the game window |
Adding Built-In Asset Types
The MGCB Editor can also create certain built-in asset types. In this section we will explore these types and this functionality. If not already open, open the MGCB Editor and perform the following:
Select the
Contentnode.Right-click it and choose
Add > New Item...from the context menu.In the dialog that appears, you will see the available built-in types.
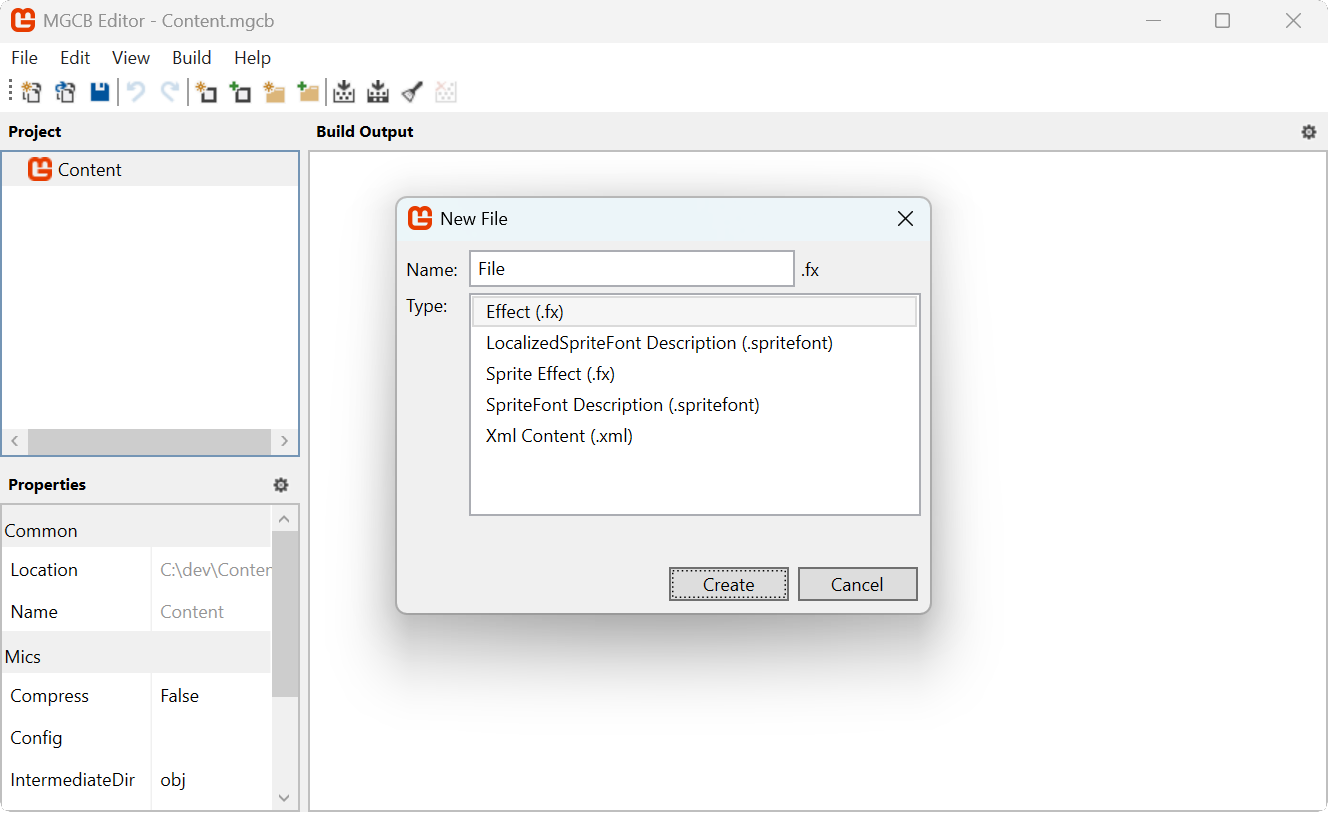
Figure 5-9: New file pop-up
The available built-in types include:
- Effect (.fx): A shader file that creates custom visual effects by controlling how graphics are rendered on the GPU.
- SpriteFont Description (.spritefont): A configuration file that defines how text will be displayed in your game, including character set and font properties.
- Sprite Effect (.fx): A shader specifically designed for use with 2D sprites to create special visual effects.
- Xml Content (.xml): A structured data file for storing game information like levels, dialogues, or configuration settings.
- LocalizedSpriteFont Description (.spritefont): A configuration file for creating fonts with support for multiple languages.
Note
Each built-in asset type comes with a template that includes the minimum required structure and settings.
For now, click the Cancel button on the new file dialog. We will explore these built-in types further in later chapters when we need them.
Conclusion
In this chapter, you accomplished the following:
- You learned about the advantages of loading assets using the Content Pipeline.
- You opened the MGCB Editor and explored its interface.
- You created a folder structure to organize your game assets.
- You added an image file asset to the content project.
- You understood the Content Pipeline workflow and how MonoGame automates the process.
- You loaded and displayed your first asset using the ContentManager.
In the next chapter, we will explore working with textures in more detail and learn about different rendering options.
Test Your Knowledge
What are the two main ways of loading a texture, and what are the pros and cons of each approach?
The two main ways to load a texture in MonoGame are:
Directly from file using Texture2D.FromFile. This method requires manually setting up file copying, offers no pre-processing benefits, and can have a higher memory footprint.
Using the content pipeline with Content.Load<Texture2D>. Using the content pipeline optimizes textures into formats for the target platform(s), automatically handles compiling and copying assets during build, and reduces memory footprint, but requires additional setup using the MGCB Editor.
During the MonoGame content pipeline workflow, assets are compiled and then copied to the project output folder. What is responsible for performing this task?
The MonoGame.Content.Builder.Tasks NuGet reference.